

Edit Sheet Def
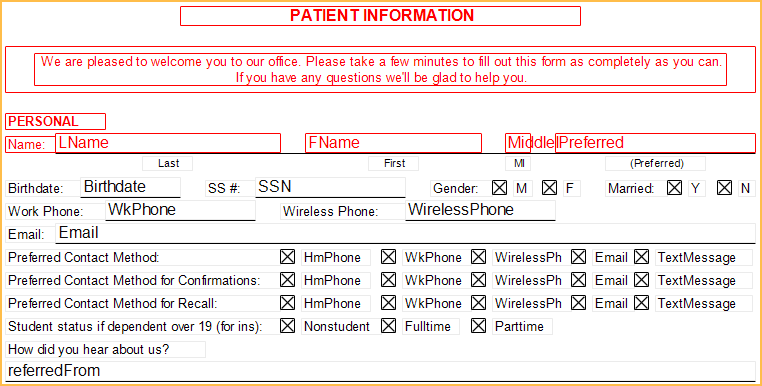
Open Dental has several internal sheets that can be copied and customized for practice needs.
In Sheets, click New, or double-click a custom sheet to edit.
![]() See our video on Mobile Web Forms: Web Forms Tutorial.
See our video on Mobile Web Forms: Web Forms Tutorial.
Preview
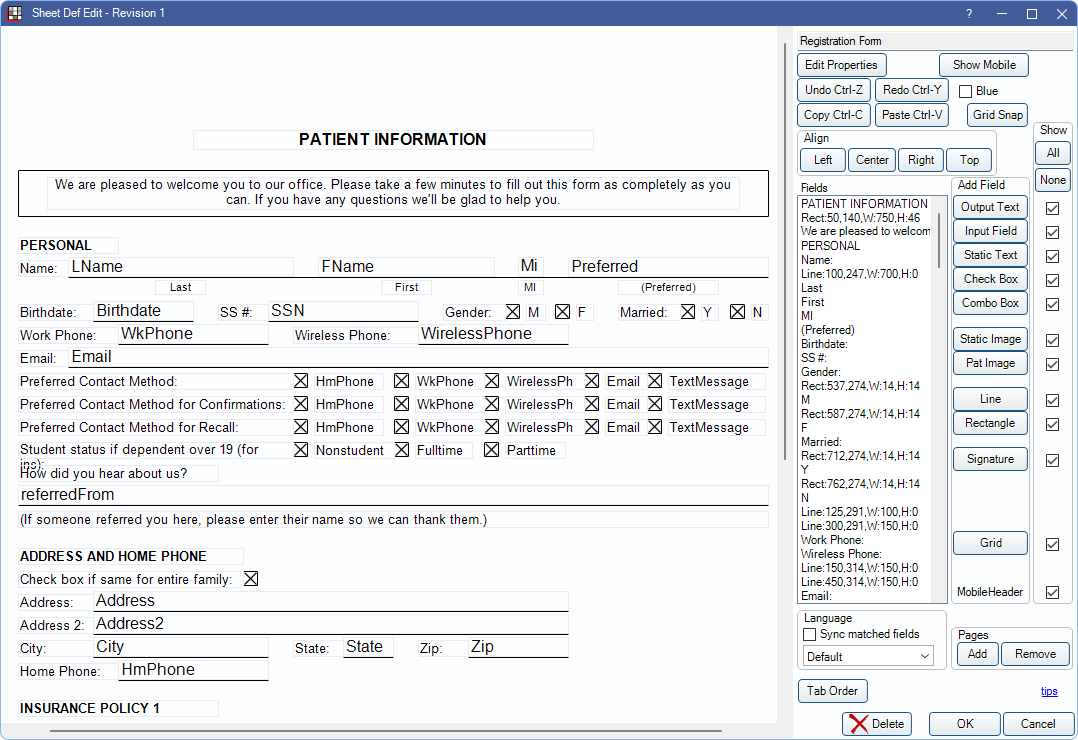
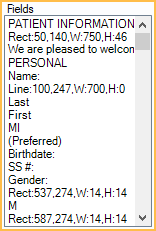
On the left is a preview of the fields and elements currently on the sheet and their location on the page.
Multiple fields can be selected at a time by highlighting in the Fields list or click and dragging by starting in a blank area to bring up the selection box. Selected fields are indicated in red.
Click and drag selected fields to move their location on the sheet.
Double-click a field or element to edit that field's properties.
Properties

Sheet Name: Name of the current sheet is listed, but cannot be edited here. Click Edit Properties to rename the sheet.
Show Mobile/Hide Mobile: Click to open or hide the Edit Mobile Sheet Def window.
Edit Properties: Click to make changes to Sheet Def Properties (e.g., name, default fonts, page orientation, page size).
Copy, Paste, Align, and Miscellaneous Tools
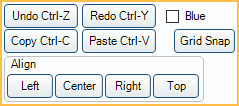
Undo Ctrl-Z: Undo the last action.
Redo Ctrl-Y: Redo to last undone action.
Copy Ctrl-C: Copy the selected field(s).
Paste Ctrl-V: Paste the selected field(s).
Blue: Check to make all fields blue except static text fields, lines, and rectangles (i.e., fields allowing custom color).
Grid Snap: Click to enable grid. Auto Snap makes it easier to move fields and ensure they are aligned. 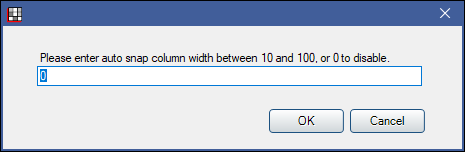
Enter a value between 10 and 100(pixels) to enable. Based on the value entered, a grid appears in the background of the Edit Sheet Def window to assist in aligning elements.
Align: Select fields and click a button to align the selected fields.
- Left: Click to align fields with the left-most selected field.
- Center: Click to align fields in the center of the selection.
- Right: Click to align fields with the right-most selected field.
- Top: Click to align fields with the top-most selected field.
Fields
Existing sheet fields are listed here. To add a new sheet field, see Add Field/Show below. To
- To edit a field or element, double-click on it in the preview, or double-click on it in the Fields list.
- To edit an image or line, double-click on the item in the Fields list.
- To set up fields that can be imported into the database, see Medical History Layout or Patient Form Layout.
- To select multiple fields, press Ctrl while clicking.
- Alternatively, click and drag on the sheet (starting in a blank area). A rectangle tool appears. Drag the rectangle to select multiple objects.
- To move fields, drag them with the mouse, or use the arrows on the keyboard.
- To move the fields in large increments, press Shift while pressing the arrows.
Guide Lines: When dragging one or more fields, blue lines appear when the the selected fields align with one or more other fields in the sheet.
Add Field/Show
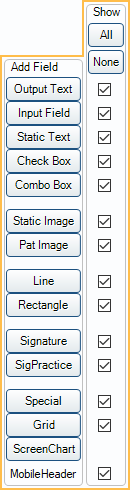
On the left, click a button to add a new Sheet Field. Not all fields are available for each sheet type. Fields not available for the sheet type are not available in the Add Field list. To edit existing sheet fields, see Fields below. MobileHeader cannot be added as a field type. The title corresponds to the Show checkbox only.
On the right, check or uncheck boxes to show or hide the corresponding field type.
- All: Click to check all boxes to show all field types.
- None: Click to uncheck all boxes to hide all fields types.
The field(s) will be hidden in the sheet in the Fields shown above.
Language
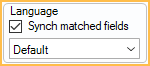
Sync matched fields: Determine if new fields added to the default language sheet are added to secondary language sheets automatically and movement syncs automatically. Checked by default.
- Checked: New fields added to the Default sheet are added to all other languages. If the field is moved on the default sheet, it is moved to the same position on the other sheets. Once a field is edited from another language (i.e., not the default) movements made on the default no longer sync to that translation. Fields that do not sync are outlined in green on the non-default sheet. Fields that sync are outlined in blue on the non-default sheet.
- Unchecked: New fields added to the Default sheet need to be added to other languages manually. Any movements also need to be made manually on other sheets.
Dropdown: Select a language translation to edit. See Language Translations for Sheets for details.
Pages

Add: Add a new page to end of the sheet.
- A 40 px margin is applied to the top of each additional page.
- A 60 px margin is applied to the bottom of each additional page.
- For example, a standard 1100 px height sheet has 1000 px of usable space.
- Any fields outside the margins are not visible when using the sheet. If a static image extends past the margins it is cropped.
Remove: Delete the last page from the sheet. No fields can exist on the page in order to remove.
If the sheet is multiple pages, a darker dotted line represents the page break.
Items should not be placed on a page break line. Any fields on a page break line are divided in two when printing.
Miscellaneous Cont.
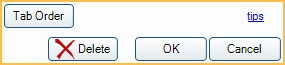
Tab Order: Click to view and edit the order followed when users fill out the form and press Tab. Tab orders can be used on Input Fields and Checkboxes. All other options are grayed out when editing Tab Order.
- Click Tab Order to switch the window to tab order mode.
- Click on each field to assign its tab order. The corresponding order number appears on the field and in the Fields list. To remove a tab order, click on the field again (it will change to zero).
- To exit tab order mode, click Tab Order again.
Tips: Click to view keyboard shortcuts and hotkeys available when editing sheets.
OK: Exit the Sheet Def Edit window and save changes. If making changes to a sheet in use by eClipboard or Web Forms, a prompt displays to update the form in use. See below for details.
Delete: Delete the entire sheet.
Cancel: Exit the Sheet Def Edit window without saving any changes.
Updating Sheets in Use
When sheets are in use by eClipboard or Web Forms, a prompt may display to update the sheet in use.
If updating an eClipboard sheet with a type of Once:
- The first prompt displays. Check Force patients to fill out again to generate the sheet again for patients who have already filled the previous version, then click OK to continue.
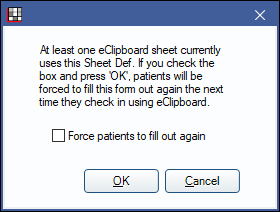
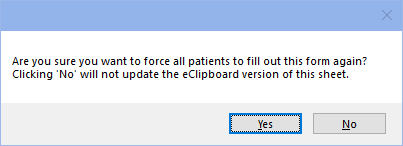
- A second prompt displays to confirm the decision. Click Yes to confirm or No to cancel.
If updating a Web Form in use, the following prompt displays.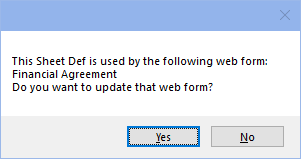
- Click Yes to update the Web Form in use.
- Click No to make changes to the sheet but not the Web Form. Web Forms can be updated from Web Form Setup later on.
Sheet Revisions
At the top of each sheet is a Revision Number.
When a sheet is in use for a patient, we use the revision number to determine if an updated sheet is needed. When using eClipboard, and a form has a behavior type of PreFill, patients are prompted to fill a new form. The patient updates the entire form again, not just the fields edited or changed.
For example, if the office created a new Financial Agreement, it would be Revision 1. A patient comes into the office for the first time and signs the Financial Agreement. Before the patient arrived for their second appointment, the office made updates to the Financial Agreement policy (now Revision 2). When using eClipboard, the patient can be prompted to sign a new agreement, since changes have been made.
A new revision number is created any time a field is deleted or added for a form, and that form was in use by a patient.
Hints
Web Forms and Browsers:
If using a sheet for Web Forms Feature, the view of the sheet is dependent on the browser the web form is viewed in. If a browser doesn't support a font, a different font is substituted. This can affect layout of the sheet. We recommend using common fonts (e.g., Times New Roman, Arial, Courier) and testing sheets on a device and browser the office plans to support. If fonts are substituted, Static Text Fields may need to be larger to fit all text.Single Page Sheets:
If a single page sheet, make sure all fields and elements are located within the page.Adding Initial Boxes:
To add initial boxes so a patient can distinctly acknowledge sections of a form, there are two options:- Create a pseudo margin so there is room on the right or left side of the form. Add checkboxes as the initial boxes and a signature box at the bottom. Patients can check the boxes, then sign at the bottom to establish identity and acknowledgment.
- If using touch screens, use Rectangles larger than checkboxes, labeled 'initials'. Customer can then use a finger or stylus to initial.
Checkboxes are usually sufficient for an electronic form because electronic signatures are invalidated if the state of a checkbox changes (e.g., from unchecked to checked).
Printing Blank Forms:
If a blank form is needed (e.g., a patient needs to fill one out by hand), create a dummy patient where the last name is entered as only a period, no other information, as seen below.Generate any forms from this patient and patient information will not be pre-filled.
Web Form Setup
If using setting up a sheet for use with Web Forms, the sheet must contain the Input Fields for first name (FName), last name (LName), and Birthdate.Organizing Fields
Do not overlap fields. Overlapping fields will cause annoyances. There is no way to set which fields draw first, so if, for example, a user tries to put a checkbox on top of a paragraph of text then the checkbox could easily be hidden under the white background of the text box.Some exceptions:
- Lines can safely overlap other fields.
- Any field may be placed on top of a background image.
- If images need to overlap (e.g., to create a page header) use a third party software to do so, then save as a single image.