

Time Clock
Employees can use the time clock to clock in and out of work.
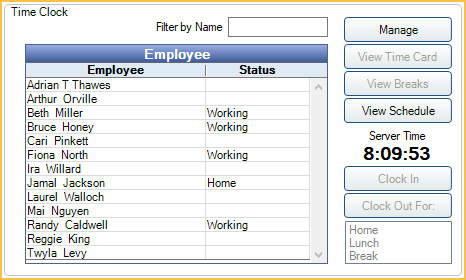
In the Manage Module, at the upper-right, is the Time Clock area.
![]() See our webinar: Time Cards.
See our webinar: Time Cards.
Before using the time clock, the following tasks must be completed.
- Add employees. See Employees.
- Create user profiles for each employee. See User Edit.
- Add pay periods in Time Card Setup.
Buttons
Manage: Manage employee time cards, calculate daily/weekly totals, and run reports. See Manage Time Cards. Only enabled for users with Edit All Time Cards Permission.
View Time Card: View or edit the selected employee's Time Card.
- Always enabled for the employee associated with the logged-in user.
- If Time Card Security is enabled in Global Security Settings and another employee is selected, this is only enabled for users with the Edit All Time Cards permission.
View Breaks: View or edit the selected employee's breaks in the Time Card.
- Always enabled for the employee associated with the logged-in user.
- If Time Card Security is enabled in Global Security Settings and another employee is selected, this is only enabled for users with the Edit All Time Cards permission.
View Schedule: Open Schedule for the selected employees.
Server Time: The server time is used to time stamp all events in the database (commlogs, audit trail, tasks, etc). This time is pulled from the server hosting the Open Dental database. If the time is changed on the server, a restart of the MySQL service may be required.
By default, the time displayed is the time of the server. To use a workstation's local time instead, see Miscellaneous Setup.
Clock In: Highlight an employee, then click to add a Clock In Date And Time.
- Always enabled for the employee associated with the logged-in user.
- If Time Card Security is enabled in Global Security Settings and another employee is selected, this is only enabled for users with the Edit All Time Cards permission.
- If the employee has no status (i.e., has never clocked in) or is clocked out for Home, a new clock event is created.
- If the employee has status was clocked out for Break or Lunch, a Clock In Date And Time is added to the the current Break/Lunch clock event.
Clock Out For: Highlight an employee, select a status (Home, Lunch, Break), then click to add a Clock Out Date And Time to the current clock event.
- Home: Use this status when leaving for the day. A Clock Out Date And Time is added to the current clock event.
- Lunch: Use this status when clocking out for an unpaid break. A new Lunch clock event is created with the Clock Out Date And Time.
- Lunch is hidden when Allow paid 30 minute breaks is disabled in Preferences. Use the Break status to clock out for unpaid breaks instead.
- Break: A new Break clock event is created with the Clock Out Date And Time. Other behavior of this status is determined by the preference, Allow paid 30 minute breaks.
- If paid breaks are allowed, use this status to clock out for paid breaks. The length of the break is tracked in the time card under Breaks. To determine if break time that exceeds 30 minute is considered paid versus unpaid, change the setting in Time Card Setup for Calc Daily button makes adjustments if breaks over 30 minutes.
- If paid breaks are not allowed, use this status to clock out for unpaid breaks.
- Lunch and Break clock events can be viewed in the Time Card by selecting the Break radio button, or clicking View Breaks from the Manage Module.
- Always enabled for the employee associated with the logged-in user.
- If Time Card Security is enabled in Global Security Settings and another employee is selected, this is only enabled for users with the Edit All Time Cards permission.
Employee Grid
Employees must be added to the Employees list to display in the grid.
When using clinics, the clinic selected in the Main Menu determines which employees are listed. When clocking in, this clinic is associated to the clock in event and subsequent clock out events.
Filter by Name: Search for an employee to narrow down Employee list. Automatically refreshes while typing.
Status: Displays current status of the employee:
- Home: Employee is clocked out.
- Working: Employee is clocked in.
- Break: Employee is clocked out for break.
- Lunch: Employee is clocked out for lunch.
- Manual Entry: An employee edited the time card so the clock out event happens in the future.