

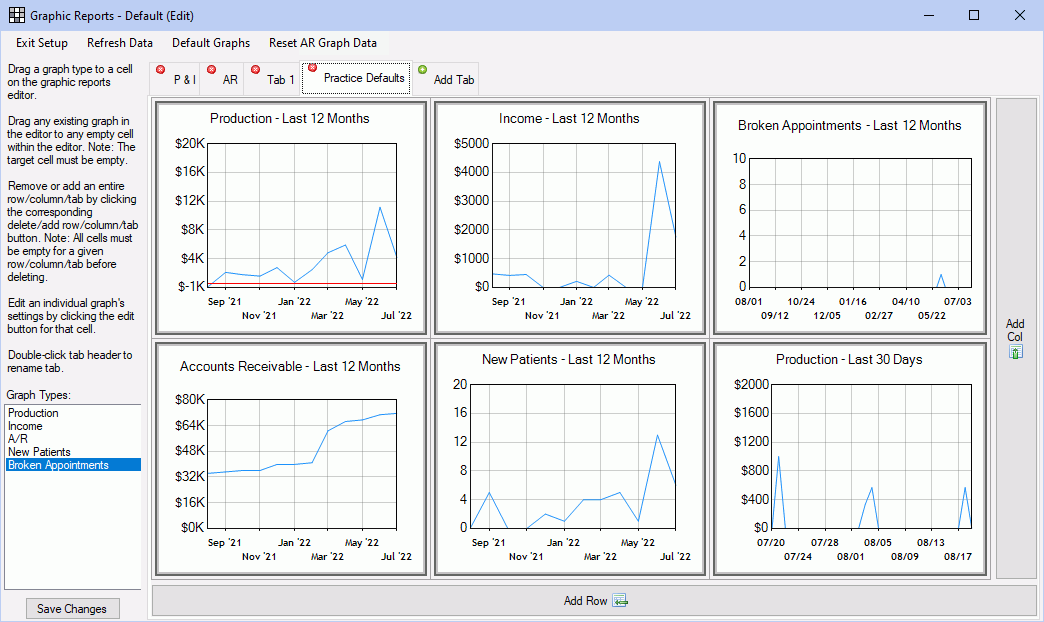
Graphic Reports Setup
Graphic Reports Setup Mode is where changes can be made to the graphic report tabs, the reports in each tab, and the settings for each individual report.
In the Graphic Reports window, click Setup.
The Graphical Setup permission is required to set up reports.
Options:
- Exit Setup: Close Setup Mode.
- Refresh Data: Update the data in all reports.
- Default Graphs: Add or restore default reports for practice, clinic, and/or provider.
- Reset A/R Graph Data: Re-run aging for months reported in any A/R graphic report. This may take a significant amount of time.
Organize Graphic Reports
Use tabs to organize graphic reports. Each tab can contain an unlimited amount of reports.
- Double-click a tab header to rename a tab.
- Click Add Tab to create a new tab.
- Click the red X to remove a tab. Tabs can only be removed when there are no reports within.
Reports are organized by cell in rows and columns.
- Click Add Column to add a new column of empty cells.
- Click Add Row to add a new row of empty cells.
- To add a new report, drag a Graph Type to an empty cell.
Hover over a report in a tab to view individual report options:
![]() Delete an entire column of empty cells (column to be deleted will be outlined in red).
Delete an entire column of empty cells (column to be deleted will be outlined in red).
![]() Delete an entire row of empty cells (row to be deleted will be outlined in red).
Delete an entire row of empty cells (row to be deleted will be outlined in red).
![]() Remove a report from a cell (report to be deleted will be outlined in red).
Remove a report from a cell (report to be deleted will be outlined in red).
![]() Drag a report to a different cell.
Drag a report to a different cell.
![]() Refresh the report data.
Refresh the report data.
![]() Open the Print Settings window. See Print/Export a Report.
Open the Print Settings window. See Print/Export a Report.
![]() Edit the report criteria.
Edit the report criteria.
Customize Individual Reports
To customize a report, hover over the report, then click the Edit icon.
- If in Setup Mode, changes to criteria can be saved.
- If not in Setup mode, changes can be dynamically viewed, but will not be saved.
The Edit Cell window will display report options as well as a preview of the report.
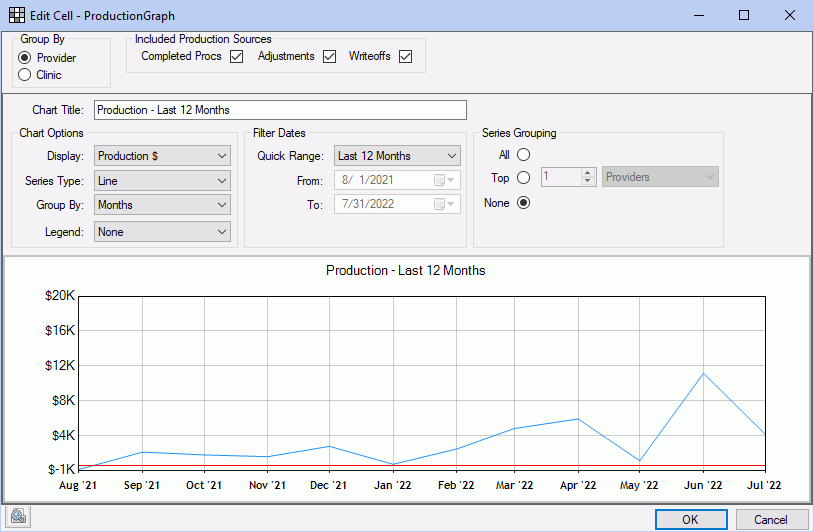
Below is a description of options. Options will vary depending on the graph type.
Group By Provider/Clinic: Only shows when using Clinics. Determines how report results are grouped.
Report specific options: These options only show on specific reports, usually at the top.
- Included Production Sources: The production sources to consider when generating a Production report. Options include Completed Procs (Procedures), Adjustments, and Write-offs (by procedure date).
- Included Income Sources: The income sources to consider when generating an Income report. Options include Pay Splits (Patient Payments) and Insurance Claim Payments.
- Count By: The criteria used to calculate the number of broken appointments in a Broken Appointments report. Options include Procedures (D9986, D9987, or both), Appointments left on the schedule, or a specific adjustment type. If adjustment type, click the dropdown to select.
Chart Title: The header for the report.
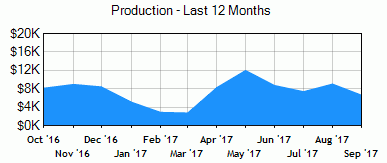
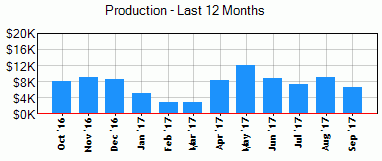
Display: The Y axis (quantity). Options vary depending on the graph type.
- Production $: Production dollar amount, based on included production sources
- Count Procedures: A count of Procedures.
- Income $: Income dollar amount, based on included income sources.
- Receivable $:
- Count: Number of broken appointments, based on the Count By logic.
- Count Patients: Number of new patients. Patients are considered 'new' when they have their first completed appointment in the date range.
Series Type: Display options for plotted data.
Stacked Area
Stacked Column, Column
Line
Group By: The Y axis (time interval). Options include days, weeks, months, or years.
Legend: Where to show a report color legend (e.g. identify colors by provider or clinic). To hide the legend, select None.
Filter Dates: The report date range.
- Quick Range: Select the general data range for the report.
- From/To: If Quick Range is custom, select a from/to date.
Series Grouping: Select additional grouping options for report data.
- All: Display data by providers/clinics.
- Top: Group data by top providers/clinics versus all other providers/clinics. For example, to compare the top producing provider with all other providers, select 'Top, 1, provider'. The resulting chart will have two groupings: 1) the top producing provider, 2) all other providers.
- None: Only display data for the entire practice; do not separate by provider/clinic.