

eCW Installation
Typically an Open Dental support technician installs Open Dental and sets up the eClinicalWorks bridge for practices, following the steps below.
Installation Path
If using Tight or Full integration, Open Dental must be installed to the same path on all computers in order for the bridge from eCW to work.
- Current recommendation: C:\Open Dental\
- Also acceptable: C:\Program Files (x86)\Open Dental\.
This path has to be typed in manually when installing to 32-bit computers. On those computers, the x86 path will not exist and is created during installation.
The path C:\Program Files\Open Dental\ is not a good choice. 64-bit versions of Windows will not allow this path to be used for a 32-bit program like Open Dental.
Also see eCW Install Workstation.
Assistance is also required from eCW installers to set this bridge path in eCW.
Bridge Setup
- In the Main Menu, click Setup, Program Links, then double click on eClinicalWorks.
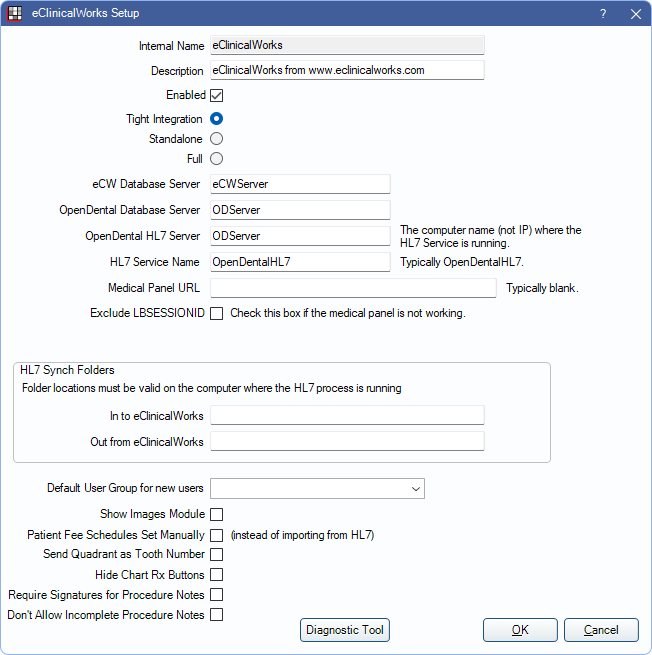
- Check the Enabled box to turn the bridge on.
- Select the eCW Bridge Modes (Tight Integration, Standalone, Full).
- Set the path(s) to the HL7 Sync Folders. The paths aree relative to the server computer, not the current workstation.
- See eClinicalWorks HL7 and follow the instructions to install the OpenDentalHL7 service on the server.
Optional Setup
- Patient Fee Schedules (Tight mode only). In Tight Integration, users cannot edit patient fee schedules in Open Dental. Instead they are imported from incoming HL7 messages. To manually select fee schedules in Open Dental, check this box. This unhides the Family Module and shows a Fee Schedule picker. Fee Schedule automation still works, but the user is allowed to change the fee schedule after it is initially set.
- Fee Schedule Changes (Full mode only). In Full mode, changes made to the fee schedules on the Edit Patient Information are not normally saved and the OK button is disabled. Typically demographic information is not saved in Open Dental because it is overwritten every time an HL7 message for the patient is processed. There is a workaround to enable the save of Fee Schedule changes only. Any other changes made to the Edit Patient Information window are overwritten.
- In the main menu, click Setup, HL7. See eCW HL7 Message Structure.
- In the Internal grid, select eCW Full Mode, then click Copy to copy the definition to the Custom grid.
- Double click on the custom definition to edit.
- Enter the values exactly as entered in the eClinicalWorks Setup window:
In to eClinicalWorks = Outgoing Folder
Out from eClinicalWorks = Incoming Folder
OpenDental HL7 Server = OpenDental HL7 Server
HL7 Service Name = HL7 Service Name
- Under Show Demographics (Address, etc), select Change. Note that warning that changes may be overwritten.
- Click OK, then restart the OpenDentalHL7 service so the new definition is used for processing/sending HL7 messages. The program link remains enabled and the setting for manual or import from HL7 message is still in effect.
- Send Quadrant as Tooth Number: Usually quadrant information shows as surface information in a claim. However, some insurance carriers require that quadrant information show as tooth number and may reject claims if it doesn't. Check this box to send quadrant information as tooth number. If an HL7 generic definition is enabled, this box does not show. Instead set the default for quadrant information on the HL7 Def Edit window.
- Hide Chart Rx Buttons: If unchecked, the Rx and eRx buttons show in the Chart Module toolbar. If checked, these buttons are hidden.
- Require Signatures for Procedure Notes: If checked, all procedure notes must be signed upon Finish and Send.
- Don't Allow Incomplete Procedure Notes: If checked, all procedure notes must be completed upon Finish and Send. If a note contains quotes "", then information must be filled in between the quotes, or the note is considered Incomplete.
Standalone Mode
If using Standalone mode, follow these instructions to set up the bridge.
- Enable the eClinicalWorks bridge, selecting Standalone.
- Follow the instructions for setting up the Open Dental eCW HL7 application.
- Work with eClinicalWorks support to have eCW start sending HL7 messages to the folder. Only demographic messages are sent (ADT). If the patient does not seem to exist in Open Dental, or the demographic information for a patient is different, then trigger an ADT message from eCW, probably by resaving the patient information in eCW. Remember that the ChartNumber in Open Dental contains the PatientID from eCW.