

Canada Attachments
For carriers that accept electronic attachments, Canada users can add the attachment to the claim or predetermination.
For Canada users, in the Account Module, right-click a claim and select Manage Canada Attachments.
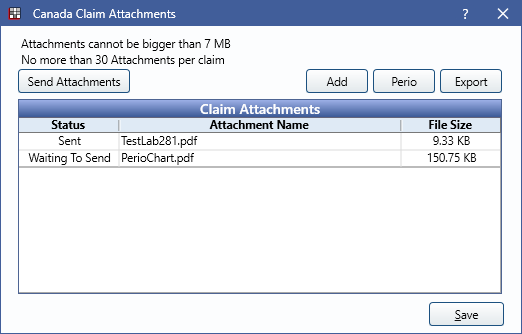
Alternatively, in the Treatment Plan Module, right-click a Predetermination and select Manage Canada Attachments.
 See our webinar: Attachments for Canadian Preauthorization and Claims
- Send Attachments: Click to send selected Claim Attachments. If nothing is selected, any unsent claim attachments are sent.
- Add: Click to open the Select Image for Claim Attachment window. See the following section for details.
- Perio: Click to attach a copy of the most recent perio exam.
- Export: Export all attached files to the path listed in the Claim attachment export path preference.
Claim Attachments Grid: Lists files currently associated with the claim.
- Status: Displays if the associated file has been sent or is waiting to send.
- Attachment Name: The file name.
- File Size: The size of the file. Up to 30 files can be added. Total attached files cannot be larger than 7 MB. Note: Some insurance carriers may impose different restrictions such as limited file type support or smaller file sizes.
Select Image for Claim Attachment
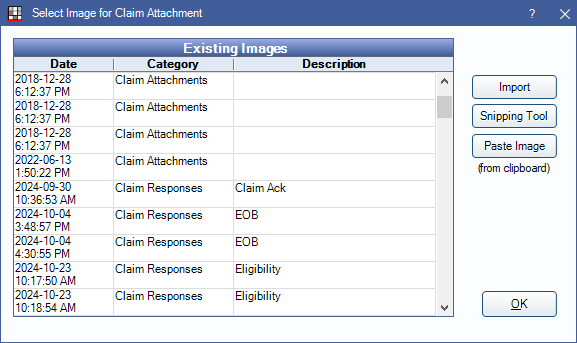
The Existing Images grid lists images and files already saved to the Imaging Module. Select a file to add as an attachment. Annotations from third-party image analysis programs and drawings are not sent on attachments when selected from the Existing Images grid.
- Import: Import a new image or file from the File Explorer.
- Snipping Tool: Click to launch the Windows Snipping Tool. Use the tool to snip an image on the screen.
- Paste Image: Paste an image already saved to the clipboard.
Attachment Process
- Send the claim or predetermination as normal.
- The response returns as an Acknowledgment or an EOB.
- Navigate to the Canada Claim Attachments window.
- Add images or files that are needed.
- Click Send Attachments.
Attachments can be sent immediately after receiving the Acknowledgment response or much later if the attachments were requested by mail. Some carriers send the final approval EOBs directly to Open Dental as a mailbox item, see Canada Claim History and ROT.
To confirm sent attachments, view the ClaimSend permission in the Audit Trail.
Sending Doctor's notes as an attachment can be done in one of the following ways:
- Copy and save the notes to a text file (e.g., Notepad), then attach the text file with the notes.
- Take a screenshot of the notes and paste it as an attachment.
Setup
To utilize attachments:
- An image category must be marked as Claim Attachments in Definitions: Image Categories.
- The carrier must have a Supported Transaction Type of Attachment.