

DoseSpot Setup
DoseSpot is a method of sending electronic prescriptions in Open Dental. It is an internet based, secure e-Prescribing system. DoseSpot integrates with Open Dental using a program link.
There are five parts to setting up DoseSpot. See each section below for details on each part.
Signing up for eRx initiates monthly fees that cannot be refunded.
Part 1: Enable DoseSpot Program Link
- In the Open Dental Main Menu, click Setup, Program Links.
- Double-click Electronic Rx.
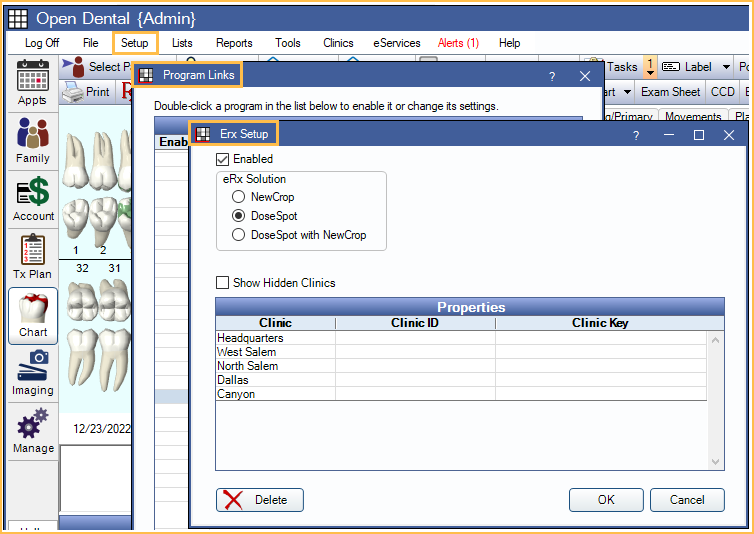
- Select DoseSpot as the eRx Solution. If the practice is in the process of switching to DoseSpot from Ensora eRx, select DoseSpot with Ensora eRx.Note: To continue the use of Ensora eRx, check Allow Ensora eRx Option in the Provider Edit Window for each needed provider until DoseSpot Identity Proofing is complete.
- Check the Enabled box.
- Click OK.
Part 2: Fill out Clinic/Practice and Provider Registration Forms
- Designate a Practice Administrator for EPCS registrations (cannot be a doctor).
- Complete the DoseSpot Registration Form. Note:
- For each additional provider, use the same form and uncheck Clinic at the top. Each provider submitting electronic prescriptions needs to submit a Provider form.
- To register additional proxy (non-provider) users, please send an email with their first and last names to erx@opendental.com.
- After submitting the form, an email is sent to the Practice Administrator's email address with instructions on the next step.
- When ready for Open Dental to generate the Clinic ID and/or Provider ID, forward the email received to erx@opendental.com.
- An email is sent to the the practice administrator containing the Clinic Key, Clinic ID, DoseSpot User ID, and Practice Administrator registration. This can take 5-10 business days to receive.
Part 3: Sign up for DoseSpot
The following instructions are for the first clinic registered. For subsequent clinics, see the Additional Clinics section below.
Enter Clinic Key and Clinic ID:
- In eRx Setup, double-click Headquarters. The DoseSpot Property Edit window will open.
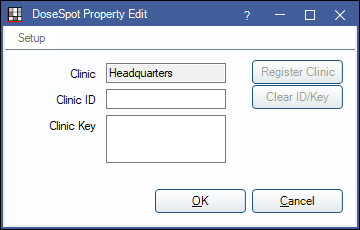
- Enter the provided Clinic Key and Clinic ID.Note:
- If clinic information is missing, click Setup to open the Edit Clinic window and enter required information.
- To delete clinic information, highlight the Clinic from the eRx Setup window and click Delete. A warning window will appear confirming the deletion of the selected row. Click OK to delete or Cancel to discard changes.
- Click OK to save.
Part 4: Enable Users
Open Dental will automatically insert the DoseSpot User ID into the DoseSpot User ID field of the User Edit window only for providers. Providers will be notified via an eRx Alert when registration is complete.
The practice administrator must manually enter a DoseSpot User ID for non-doctors and providers with multiple ID numbers. This process can also be used for providers in the event a provider DoseSpot User ID was not automatically entered in the DoseSpot User ID field.
Enter DoseSpot User ID to access DoseSpot: This is required for each provider and non-doctor who will be queuing e-Prescriptions.
- Once the DoseSpot User ID has been received, in Open Dental, click Setup, Security Settings (Global Security Settings).
- Double-click the user to open the User Edit window.
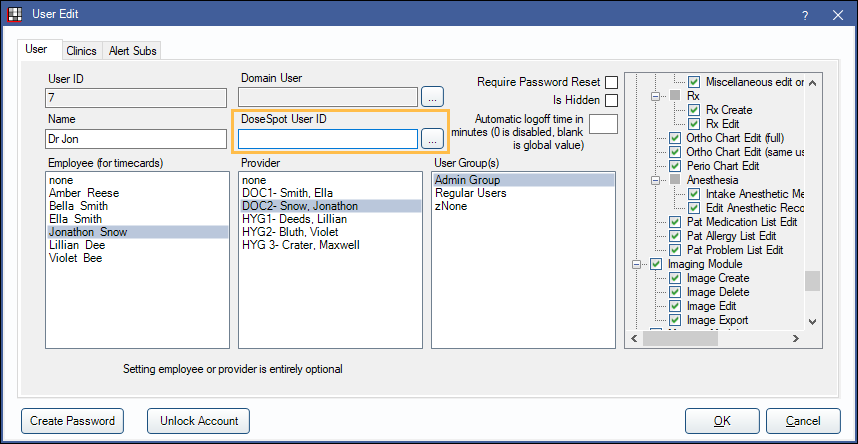
- In the DoseSpot User ID field, enter the DoseSpot User ID.
For providers with multiple DoseSpot User IDs (e.g., providers with multiple NPIs), click [...] to enter a number per clinic. - Non-doctors must have their employee associated with the user, and doctors must have their provider associated.
- Click OK to save.
The provider and non-doctor(s) may now access DoseSpot.
Part 5: Complete Identity Proofing
Important: Identity Proofing is typically completed for each provider upon first launch of DoseSpot. In the event Identity Proofing was not completed, follow the steps below.
This process only applies to prescribing providers. Each prescribing provider must complete Identity Proofing before sending e-Prescriptions.
- Select any patient and click eRx.
- Click and agree to the first two user agreements.
- Click the last link for Identity Proofing.
- Fill out the demographic information, enter personal phone number, and check the One Time Passcode (OTP) agreement box.
- Enter driver's license information. Enter personal credit card number. Credit card number is required for Identity Proofing.
- Click Next.
- A text message with a one time passcode is sent to the provider's phone. Enter the code into the box and click Next.
- Answer the security questions as prompted.
- Once security questions are complete click Next.
- Click Set PIN.
- Create a 4-digit pin that will be used when sending all prescriptions. Provider can now send non-controlled substances electronically.
- Each prescribing provider will create a PIN. This PIN is required every time an e-Prescription is sent.
- Some prescribing provider will receive a letter in the mail (via home address) from Experian that contains their Session ID needed for EPCS registrations. The provider will be notified after IDP if a letter is being sent.
Additional Clinics
To register additional clinics:
- Go to Setup, Program Links.
- Double-click electronic Rx.
- Double-click the clinic.
- Click Register.
- Click OK.
- Repeat for each clinic.
- Select any patient and click eRx in the Chart Module.
- Clinic will be ready for use in 2-5 business days.
Register for EPCS
There are two parts to register for Electronic Prescribing for Controlled Substances (EPCS).
Part 1: Practice Administrator Login
The practice administrator is designated during the Sign Up for DoseSpot process above. This person will access the Administration Console in DoseSpot and enable EPCS for the registered provider(s).
- In a web browser, navigate to http://pss.dosespot.com/Admin.
- Enter login information. Login information is sent via email when the clinic is registered for DoseSpot.
- Enter mobile phone number and click Send Me DUO Activation Texts to receive two text messages: one text to download the DUO Mobile app and another to sync the app to the Admin Console login.Note: DUO only supports Android 11+ and iOS 15+.
- Download the DUO Mobile app and follow the on-app prompts.
- Click the link received in the second text message to sync the DUO app with the Admin Console.
- Enter the One-Time Passcode (OTP) in the Administration Console and click Login.
- Click Edit on the provider/clinician to enable EPCS.
- Under TFA Authentication, check the EPCS/TFA Activation box.
- Click Save.
Part 2: Activate One Time Passcode (OTP) Device
EPCS registration is required in order to submit electronic prescriptions for controlled substances. The provider will also need to download the DUO Mobile App from the Google Play Store or Apple App Store.
- Log into Open Dental as the provider who activated EPCS/TFA.
- In Open Dental, select a patient.
- In the Chart Module, click eRx to open DoseSpot.
- Click the notification alert
 in the upper left.
 - Click Activate TFA Authentication.
- The TFA Authentication window will display.
- Enter the Credential ID generated from the DUO Mobile app. Do not include spaces.
- Enter the Session ID from the Experian letter.
- Enter the displayed 6-digit code from DUO Mobile app into the TFA Code field on the computer.
- Enter in the provider's PIN created during the IDP setup process.
- Click Save.
The provider can now send both controlled and non-controlled substances electronically.
New Phone
If the provider has a new phone, do the following:
- Download the DUO App from the app store.
- Have the practice admin log into the DoseSpot Admin Console (http://pss.dosespot.com/Admin) and click Edit next to the provider's name.
- In the EPCS tab, click Re-Send DUO Mobile.
- Verify phone number.
- Click Resend.
- The provider will receive text message with a link. Click on the link to sync DoseSpot with new phone.
If the provider's phone number has changed, contact Open Dental Support to have it updated.