

Imaging Quality
These are the default settings used when scanning forms, letters, photos or radiographs in the Imaging Module.
In the Main Menu, click Setup, Imaging, Scanning.
Settings in this window only apply to the current workstation (computer). Also see Scanners.
Set Default Scanner: Click to select the default scanner.
- Open Dental Cloud users are prompted to install or launch Open Dental Cloud Client if it is undetected.
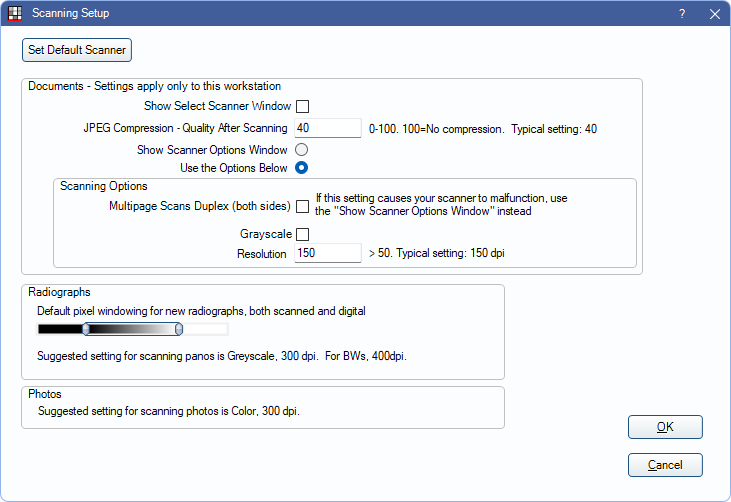
Documents
These settings are for scanning single documents and multi-page documents in the Imaging Module.
Show Select Scanner Window: Check this box to be prompted to select the scanner before each scan. The option selected also applies when a user clicks Scan Radiograph or Scan Photo in the Imaging Module toolbar.
JPEG Compression - Quality After Scanning: Set the image quality (0 - 100) for the file that is saved in the A to Z Folder. A lower number means more compression and smaller file size. 100 = no compression 0 = maximum compression. A typical setting is 40.
Show Scanner Options Window: Select this option to open the scanning device window to select scanning options each scan. We recommend this option in order to customize scan settings (e.g., dpi).
Use the Options Below: Select this option to use the default scanning options each scan, instead of opening the scanning device window. The option selected also applies when a users clicks Scan Radiograph or Scan Photo.
If Use the Options Below is checked, the options set below are used. The options selected also apply when a user clicks Scan Radiograph or Scan Photo.
- Multipage Scans Duplex: Scans both sides of documents when checked. Scans one side of documents when unchecked.
- Grayscale: Scans in grayscale when checked. Scans in 24-bit color when unchecked.
- Resolution: The dots per inch (dpi) of the document that is collected from the scanner. Must be at least 51 dpi.
Recommended Scanning Settings:
- Documents: 150 dpi.
- Photos: color, 300 dpi.
Radiographs
Set the default pixel windowing values to use when scanning radiographs. A slider is also available in the Images module to adjust pixel windowing for individual radiographs. Windowing is useful for images like radiographs because it isolates changes in gray levels. For more details, see Enhancing Radiograph Images.
Recommended Scanning Settings:
- Panos: grayscale, 300 dpi.
- BWs: grayscale, 400 dpi.
Photos
Recommended Scanning Settings: color, 300 dpi.