

Daisy Chain Replication
Daisy chain Replication configuration is very complex and should only be attempted by users who are experienced with replication. Incorrect setup can result in corrupt data, computer crashes, or other serious consequences. For a one-way replication configuration, see One-Way Replication.
- The recommended steps below include setting up auto increment variables to avoid data collision. If you already use random primary keys instead, see Daisy Chain Replication: Add Server (random primary keys).
- It is recommended to use a folder synchronization software for the A to Z Folder when using replication. See Online Backups.
- If replication is currently setup and you are trying to re-create the replication setup, you must first stop the existing Replica service by running the SLAVE STOP; while the MySQL service is started.
- Versions of MySQL or MariaDB must match on all servers.
- For instructions when updating, see Replication: Update Open Dental Version.
- To add a new server to the chain, or remove a server, see Daisy Chain Replication: Add Server.
Instructions
MySQL comes with its own replication capabilities.
- Add servers and install the OpenDentalReplicationService to each Replica. See Replication Setup.
You must have the Open Dental Replication Service when running Daisy Chain Replication. The service will notify all users and IT staff if replication crashes via Alerts. We are not responsible for the damage done when databases continue to be used after an error crashes replication. - Stop the MySQL service on all replication servers (net stop mysql). On some operating systems, this will require you go into the system services in Control Panel, Administrative Tools, Services and stop the MySQL service manually. If the MySQL service is started on any replication server before step 5, then replication will fail.
- On all replication servers, wipe out all loose files in the mysql data directory which do not reside in a subfolder. If all tables in all databases are MyISAM and the database management system in use is MySQL 5.5, then all of the "ib" files can be moved to a loose files folder. If all tables in all databases are MyISAM and the database management system in use is MySQL 5.6 or MariaDB 10.5 or any InnoDB tables exist in any database, the "ib" files should not be removed.
- Copy the information that corresponds with your database management system.
- If all tables in all databases are MyISAM and the database management system in use is MySQL 5.5, make an identical database copy on all replication servers.
- If all tables in all databases are MyISAM and the database management system in use is MySQL 5.6 or MariaDB 10.5 or any InnoDB tables exist in any database, make an identical data directory copy on all replication servers.
- On all replications servers, set auto increment / offset variables in the my.ini file. Do this before going to the next step. See Replication Auto Increment.
- Make sure all the servers are synced to the same date and time. If locations are in different time zones, data will be synced but may not show at all locations.
- Start the MySQL service on all replication servers (net start mysql). On some operating systems, such as Windows Vista, this will require you go into the system services in Control Panel, Administrative Tools, Services and start the MySQL service manually.
- Set each replication server's Primary (Master). Go to the command line and navigate to the appropriate bin folder of the MySQL service (typically C:\Program Files\MySQL\MySQL Server 5.5\bin or C:\Program Files\MariaDB 10.5\bin) and type the following: mysql -u root opendental where opendental is the name of the database. If you have a MySQL user password, add -p to the command.
For users on MySQL 5.5 / 5.6 / MariaDB 10.5 or lower:CHANGE MASTER TO
MASTER_HOST = 'MASTER_OF_THIS_SERVER',
MASTER_USER = 'repl',
MASTER_PASSWORD = 'ENTER PASSWORD HERE';
For users on MariaDB 10.11:
CHANGE MASTER TO
MASTER_HOST = 'MASTER_OF_THIS_SERVER',
MASTER_USER = 'repl',
MASTER_PASSWORD = 'ENTER PASSWORD HERE',
MASTER_USE_GTID = no;
- Set MASTER_HOST to either the IP address or computer name of the replication Primary (Master) of this server. We recommend IP address to reduce possible DNS issues.
- Set MASTER_PASSWORD to a password of your choosing.
- For users on MariaDB 10.11, also add the additional line MASTER_USE_GTID = no; under Master_Password.
- For each replication server, run the following queries to grant permission for any replication Replica (Slave) to read data.
GRANT CREATE TEMPORARY TABLES ON opendental.* TO'repl' IDENTIFIED BY 'ENTER PASSWORD HERE';
GRANT SUPER ON *.* TO'repl' IDENTIFIED BY 'ENTER PASSWORD HERE';
GRANT REPLICATION SLAVE ON *.* TO'repl' IDENTIFIED BY 'ENTER PASSWORD HERE';
- The opendental.* should be the name of your mysql database and must be lowercase. The .* means everything within the specified database.
- Run START SLAVE; in the mysql command interface for each replication server in the chain.
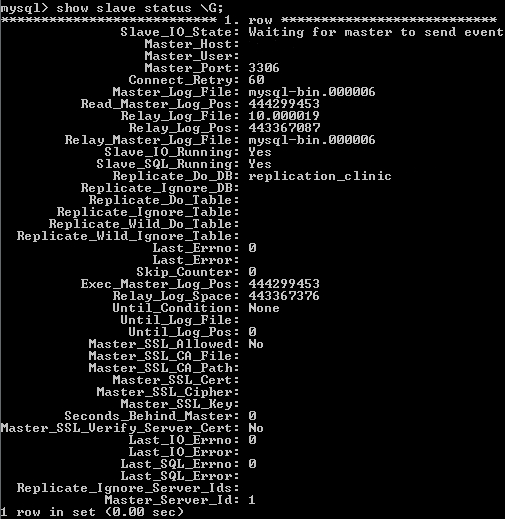
- Run SHOW SLAVE STATUS\G in the mysql command interface for each replication server in the chain. Make sure that the Slave IO Running and Slave SQL Running columns both say, Yes.
- How to test replication between two replication servers. Only test two replication servers at a time. We recommend testing the first replication server in the chain with the last replication server in the chain. If the test fails, make several smaller tests between consecutive replication servers.
- Ensure replication is working across each of the servers by performing the following:
- Create an appointment on Server 1 and verify the appointment shows up on ALL other servers.
- Make a change to the appointment on Server 2 and verify that the change reflects on ALL other servers.
- Repeat Step 2 until you have made a change from each server and verified the changes reflected on all other servers.
- It is important to make a change from EVERY server and make sure those changes are reflected on each server.
- Ensure replication is working across each of the servers by performing the following:
| Server_1 IP 192.168.0.1database=databasename | Server_2 IP 192.168.0.2database=databasename | |
|---|---|---|
Check the log files to make sure the files were created and time stamps are recent. C:\mysql\data |
C:\mysql\data>dir 02/22/2008 01:25 PM 57 relay-log.info 02/22/2008 09:12 PM 235 server-relay-bin.000043 02/22/2008 09:12 PM 26 server-relay-bin.index 02/22/2008 01:22 PM 17,642 server.err 02/22/2008 01:22 PM 5 server.pid |
C:\mysql\data>dir\ 02/22/2008 01:25 PM 57 relay-log.info 02/22/2008 09:12 PM 235 server-relay-bin.000043 02/22/2008 09:12 PM 26 server-relay-bin.index 02/22/2008 01:22 PM 17,642 server.err 02/22/2008 01:22 PM 5 server.pid |