

TigerView Bridge
In the Main Menu, click Setup, Program Links. Double-click on TigerView from www.televere.com.
TigerView is an imaging software. Website: www.televeresystems.com.
Visix for ScanX is a rebranded version of TigerView, so use the TigerView bridge to set up the Visix software. ScanX also has a self-named intraoral camera, which does not use this bridge. This bridge is for Visix and TigerView software only.
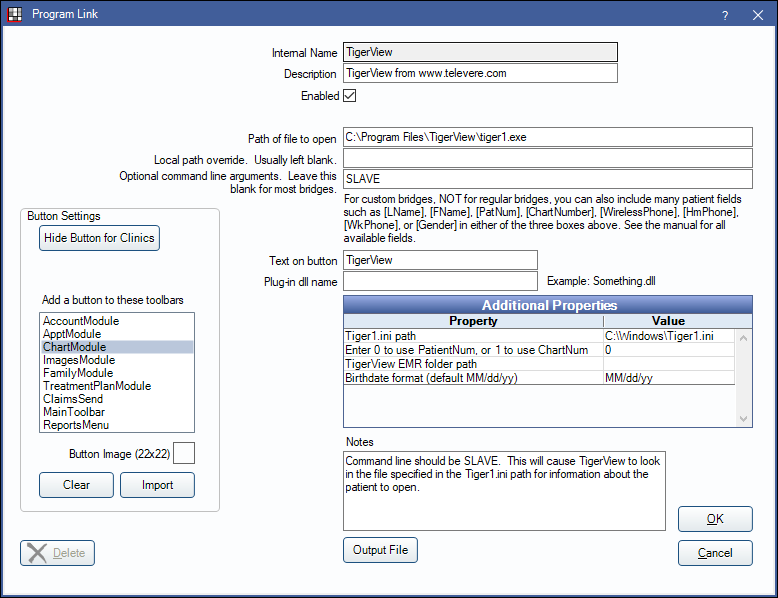
To enable the bridge:
- Check the Enabled box.
- Verify the Path of file to open.
- Double-click on a row in Additional Properties to change settings.
- Set the Tiger1.ini file path. It should always be set to match the default TigerView ini path because TigerView always looks to its default path and does not return patient data if it cannot find the ini file.Note: Certain newer versions of TigerView may require the Tiger1.ini file to be located in the same folder as the Tiger1.exe program file (e.g., C:\tigerview8\).
- Use the PatNum (enter 0) or ChartNum (enter 1) as the patient ID.
- Set the EMR folder path if using TigerView EMR.
- Set the format for birth dates. It should be set to MM/dd/yy (default) or MM/dd/yyyy (4-digit year).
- Set the Tiger1.ini file path. It should always be set to match the default TigerView ini path because TigerView always looks to its default path and does not return patient data if it cannot find the ini file.
- Set up a clickable bridge button.
- Under Add a button to these toolbars, highlight where to display the button.
- Enter the Text on button.
- (Optional) Import an image to show on the button (22 x 22 pixels).
- If using clinics, click Hide Button for Clinics. Select which clinics the button should display on.
- Click Save.
Technical Details
Clicking the Visix/TigerView button opens the patient in the Visix/TigerView software. If the patient doesn't yet exist, it creates a record using the patient's name and PatNum.
Thumbnails are pulled into Open Dental with the help of TigerView EMR.
- Run TigerView EMR and set an export path.
- In Additional Properties on the Program Links window, set the TigerView EMR folder path to the export path.
If set up properly, when Open Dental starts and while it's running, thumbnails will be copied from the TigerView export folder into the patient's OpenDentImages folder. An x-ray Image Category that shows in Chart Module is automatically created in Definition Setup. Thumbnails show under the x-ray category in the Imaging Module and in the x-ray tab at the bottom of the Chart Module.
Open Dental writes data to the Tiger1.ini file similar to this:
[Slave]
LastName=Spander
FirstName=Jeremy
PatientID=1234
PatientSSN=123456789
Gender=Male
DOB=03/21/75
AddrStreetNo=123 Main
AddrCity=
AddrState=OR
AddrZip=97302
PhHome=(503)363-5432
PhWork=(503)271-3821
Open Dental then launches TigerView. TigerView opens with no splash screen to the designated patient. TigerView deletes the patient information from the ini file.