

Patient Portal Access
Use the Patient Portal window to provide or remove access to the portal.
In the patient's Chart Module, Patient Information area, double-click the Patient Portal row.
Alternatively, in the EHR Dashboard, click Provide Online Access next to the ElectronicCopyAccess measure.
Before access can be granted:
- Patient Portal must be enabled in the eServices Signup Portal.
- The Patient Portal row must first be added to Chart Patient Information in Display Fields.
- The patient must have a name, address, date of birth, email address, and phone number entered in the Family Module.
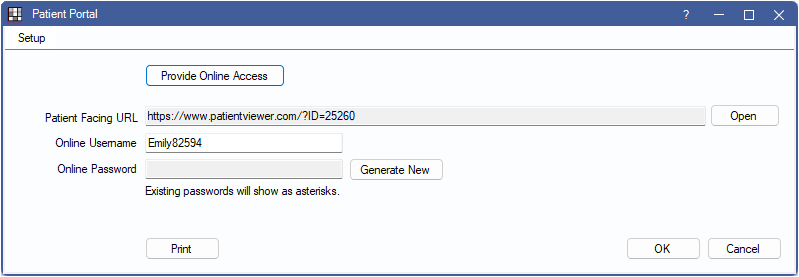
Setup: Click to open Patient Portal settings.
Provide Online Access: Displays when a patient does not have access. Click to automatically generate a user name and password.
Remove Online Access. Displays when a patient has access. Click to remove the patient's ability to login to the portal.
Patient Facing URL: The patient portal web address. Click Open to open the URL in a web browser.
Online Username: Defaults to the patient's first name plus a random number. The user name is not case sensitive. Patients can change their username after logging into Patient Portal.
Online Password: Displays the generated password or asterisks if a password already exists. The password is case sensitive.
- Click Generate New to assign a random 8-digit one-time use password.
- One-time use passwords generated by Open Dental are valid until the patient changes their password, or until a different password is generated in Open Dental (manually or via a sheet or invitation).
- The office staff can manually change a password by typing in the field. Passwords must be at least 8 characters and have one uppercase letter, one lowercase letter, and one number.
- Patients can change their password after logging into Patient Portal.
Print: Generate a printout of the user name, password, and the patient portal URL to give to the patient.
For information about what the patients sees when they log in to the portal see Patient Portal: What Patient Sees and Authorized Representatives.
Alternative Methods to Grant Access
Option 1: Set up Patient Portal Invites which can be sent via email before or after a scheduled appointment. See Edit Rule, Patient Portal Invites section for details.
Option 2: Generate a Sheet that has the patientPortalCredentials Sheet Static Text Field on it.
- The credentials only display on the sheet if the patient does not have online access at the time the sheet was created.
- Example of text that replaces the patientPortalCredentials static text field:
Patient Portal Login
UserName: Ann123
Password: xxxxxx