

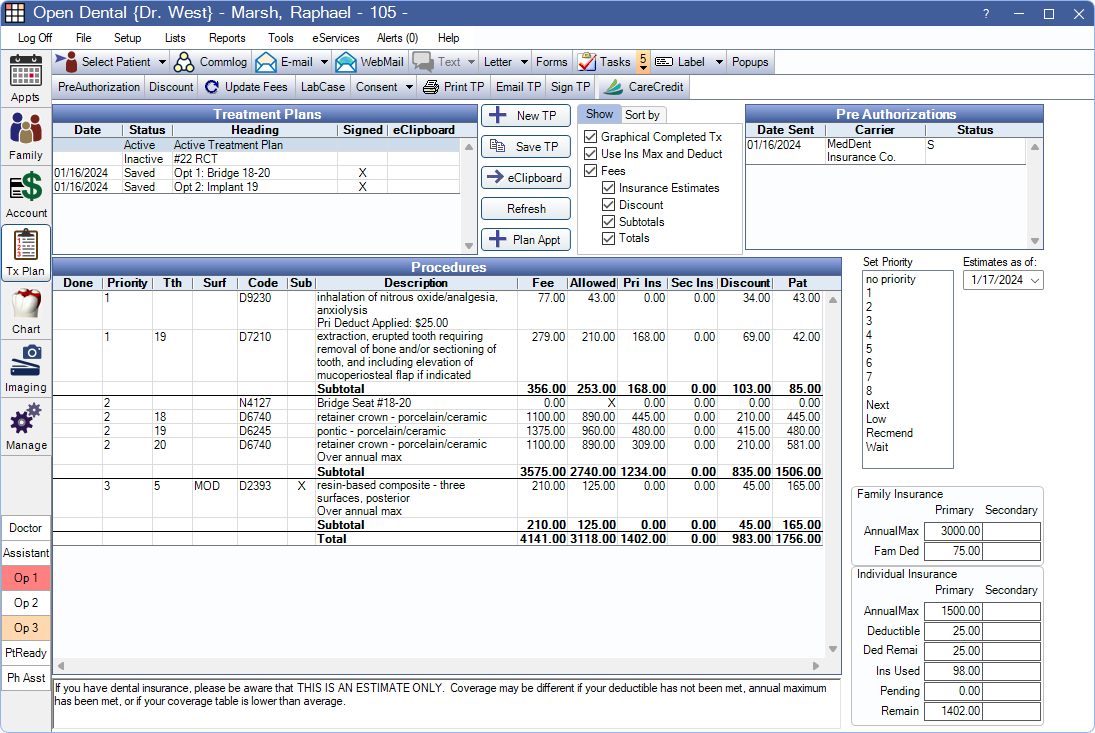
Treatment Plan Module
In the Treatment Plan Module, staff can manage and prioritize treatment plans for a patient.
![]() See our video playlist: Treatment Plan Webinars.
See our video playlist: Treatment Plan Webinars.
Treatment Plan Toolbar
These buttons appear in the top toolbar:
- Preauthorization: Highlight procedures in an active or inactive treatment plan and click to create a Preauthorization.
- Discount: Add a Procedure Discount to selected treatment planned procedures.
- Update Fees: For this patient only, update all fees and insurance estimates for all active and inactive treatment. See also Fees Update.
- LabCase: Create a new Lab Case.
- To include, treatment planned procedure information on the Lab Slip, highlight procedures before clicking LabCase.
- Requires treatmentPlanProcs or treatmentPlanProcsPriority Static Text Fields to be added to the selected Lab Slip Layout.
- To include, treatment planned procedure information on the Lab Slip, highlight procedures before clicking LabCase.
- Consent: See Consent Form.
- Print TP: Print the selected treatment plan. To customize the printed layout of treatment plans, see Treatment Plan Layout. If selecting a saved treatment plan that has been saved to the Imaging Module, a PDF viewer opens. The treatment plan can be printed from the PDF viewer.
- Email TP: Email the selected treatment plan.
- Sign TP: Electronically sign a saved treatment plan.
- CareCredit: Launch the CareCredit Action window. To hide this button click the dropdown and select Disable Advertising.
Treatment Plans
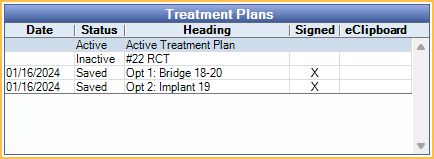
The Treatment Plans grid in the upper-left corner lists all active, inactive, and saved treatment plans for this patient. See Edit Treatment Plan for additional information on creating and editing treatment plans.
Date: Displays the date for Saved treatment plans.
- Status: There are multiple treatment plan statuses.
- Active: There can be one active treatment plan per patient. Procedures attached to scheduled appointments are always on the active plan. Only procedures with a Treatment Planned (TP) status can be on an active plan. As procedures are completed, they are removed. The active plan determines the following:
- The default procedures in the Chart Module, Progress Notes.
- The default procedures drawn on the Graphical Tooth Chart.
- The default procedures available when creating or editing an Appointment.
- Inactive: There can be multiple inactive treatment plans. Procedures on inactive plans can have a status of Treatment Planned (TP) or Treatment Planned Inactive (TPi). TP procedures also appear in the Active treatment plan.
- Saved: Treatment plan that has been saved to create permanent record. These can be signed or sent to eClipboard.
- Active: There can be one active treatment plan per patient. Procedures attached to scheduled appointments are always on the active plan. Only procedures with a Treatment Planned (TP) status can be on an active plan. As procedures are completed, they are removed. The active plan determines the following:
- Heading: The name given to the treatment plan. Cannot be changed for Unassigned Inactive treatment.
- Signed: Displays an X if the treatment plan has been signed by the patient.
- eClipboard: Displays an X if the treatment is currently being reviewed by the patient via eClipboard. To remove the treatment plan from eClipboard, click the X.
Buttons
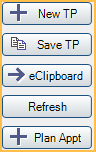
The following buttons are available to manage treatment:
- +New TP: Click to create an Inactive treatment plan. See Edit Treatment Plan for details.
- Save TP: Highlight procedures and click to create a Saved treatment plan. See Edit Treatment Plan for details.
- eClipboard: Click to present a saved treatment plan using eClipboard: Treatment Plan.
- Refresh: Refresh treatment plan and deselect any highlighted procedures.
- +Plan Appt: Create Planned Appointments.
Show Tab
Options selected on the Show tab affect what is displayed in the Procedures grid and printed/emailed treatment plans.
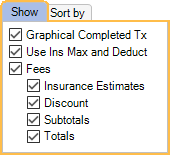
- Graphical Completed Tx: Show completed treatment plan procedures on the printed Graphical Tooth Chart. Set the default in Preferences.
- Use Ins Max and Deduct: Indicate when a patient's insurance maximum or deductible has been applied or reached. Only visible when patient has insurance.
- Fees: Show or hide all fee information.
- Insurance Estimates: Indicates PPO or allowed fee, primary and secondary insurance estimates, and patient portion, if the patient has insurance. If the patient has a discount plan, it shows the discount (DPlan) and patient portion. Checked by default when patient has insurance or a discount plan.
- Discount: Show procedure discount amounts. Can only be checked if there is a discount or write-off in one of the treatment planned procedures.
- Subtotals: Show Subtotals for each priority level.
- Totals: Show Totals at the bottom of the grid.
Sort By Tab
Procedures are always sorted first by priority, then by date. It can further be sorted by tooth number or order of entry. The default is determined by the Sort procedures by preference,.
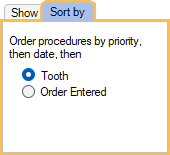
- Tooth: Sort by tooth number from smallest to largest. Procedures with no tooth number list first.
- Order Entered: Sort by oldest procedure first. Based on Date in Procedure Info.
Sort order does not sort by procedure code. If two codes have the same priority, treatment area, and date then the order is random. It may be in the order charted but it may not. The order could even change.
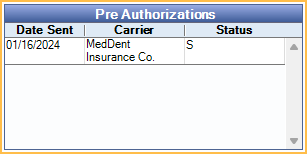
Preauthorizations
The box at the upper-right shows all Preauthorizations for this patient. Double-click a preauthorization to edit.
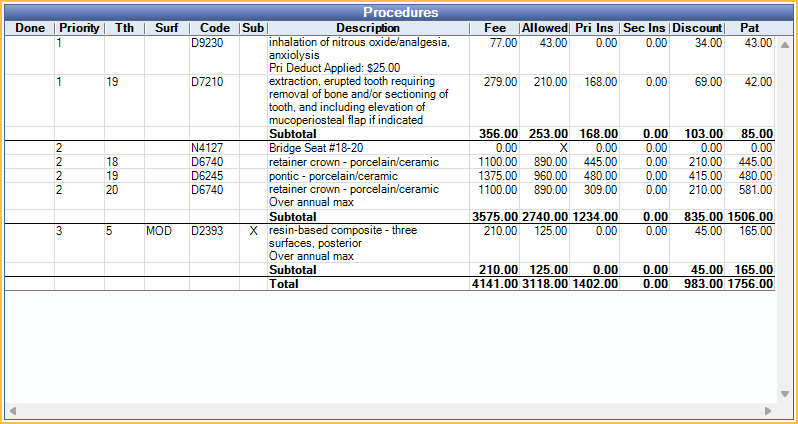
Procedures Grid
When clicking on a treatment plan, the associated procedures are shown in the Procedures grid. What displays in the grid displays on a printed Treatment Plan.
In an active or inactive treatment plan, double-click a procedure to open the Procedure Info window. In a saved treatment plan, double-click a procedure to open the Edit Treatment Planned Procedure window (see Edit Treatment Plan).
The columns displayed in the Procedures Grid can be customized in Display Fields, TreatmentPlanModule. Options include:
- Abbr: The procedure code abbreviation.
- Appt: Indicates if the procedure is attached to any appointment. This field is not included when the treatment plan is printed, signed, or saved to images.
- Blank: Procedure is not attached to any appointment.
- X: Procedure is attached to a scheduled appointment.
- P: Procedure is attached to a Planned Appointment.
- U: Procedure is attached to an Unscheduled appointment.
- Cat% UCR: Displays the UCR fee for the procedure, regardless of which insurance type is selected in the insurance plan. When this column and the Fee column display, the Discount column will show. Discount = UCR Fee - Procedure Fee.
- Clinic: The clinic associated with the procedure code.
- Code: The Procedure Code.
- DateTP: Date the procedure was treatment planned.
- Description: Procedure description, details related to the insurance estimates (e.g., deductibles, over annual max, etc.), and estimated tax.
- Discounts: Any discounts applied (procedure discounts + any PPO insurance plan write-offs). Not an option if the UCR fees match the PPO fee.
- Done: An X indicates a procedure is completed (saved treatment plans).
- DPlan: Any discount applied as a result of an in-house discount plan (UCR fee - discount plan fee). This column only shows when insurance estimates is checked under the Show tab, the patient has a discount plan, and the DPlan display field is added to treatment plan module.
- Dx: The procedure's diagnosis.
- Fee: The fee charged for the procedure.
- Allowed: The PPO fee for PPO plans or the allowed fee for out of network plans. An X will display in this column for procedures marked DoNotBillIns.
- If Enterprise Setup is enabled in Show Features, the Allowed fee shown is affected by the Hygiene procedures use primary provider PPO fee preference.
- Pat: The estimated patient cost (Fee - Pri Ins - Sec Ins - Discount).
- Pri Ins: The insurance estimates for the insurance plan listed first in the Family Module.
- Priority: The procedure's priority level.
- Prognosis: The prognosis assigned to the procedure on the Enter Treatment and the Procedure - Misc Tab.
- Prov: The provider associated with the procedure.
- Sec Ins: The insurance estimates for the insurance plan listed second in the Family module.
- Sub: An X indicates the procedure uses a substitution code in Lists, Procedure Codes.
- Surf: The tooth surface.
- Tth: The tooth number.
The Pri Ins and Sec Ins estimates can be misleading if, in the Family Module, the patient has a dental plan listed first and a medical plan listed second. In this particular situation, the Pri Ins column will show the dental plan estimates, and the Sec Ins column will show the medical plan estimates. We recommend listing the medical plan first in the Family Module.
If the patient has more than two insurance plans, double-click the procedure to open Edit Procedure and view any additional estimates that are not considered in the treatment plan.
If a procedure is attached to a Pre Authorization, only the information from the insurance estimate Claim Procedures ( claimprocs ) is considered. PreAuth claim procedures are not considered.
Set Priority & Estimates as of
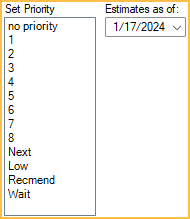
The set priority list is used to assign priorities to the procedures on the treatment plan. Select the procedure(s), then click on a priority level. The sort order of the procedures will change accordingly. Priorities can also be set while entering treatment in the Chart module, and on the Procedure Info window.
Priority options can be customized in Definitions: Treat' Plan Priorities. You can use numbers, letters, or words up to 7 characters. You can change the sort order of procedures according to priority, change text colors, and hide priorities from view. Examples of other possible priority levels are Sched, Wait, Next, ?, Decline, Last, Low, High, NewYear, Urgent, WaitIns, Altern, Plan A, Plan B, RecPlan, and AltPlan.
Estimates as of: Only displays when Enable Insurance Frequency Checking is checked in Preferences. Defaults to the current date. Use the dropdown to select a future date to see Treatment Plan estimates as of the selected date.
- For patients with insurance: Changing this date updates estimates in the Procedures grid and totals in the Insurance Grids to reflect the selected date. Procedures that are not covered due to insurance limitations (e.g., annual max, waiting period, frequency limitation) as of the selected date are noted in the description column.
- For patients with a Discount Plan: Changing this date updates estimates in the Procedures grid only. Procedures not covered due to Discount Plan limitations (i.e., annual max or frequency limitation) as of the selected date are noted in the description column.
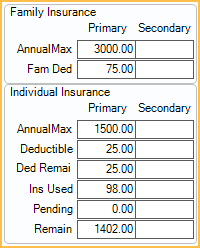
Insurance Grids
When the patient has an insurance plan, the area at the lower-right shows remaining family and individual insurance benefits at a glance. For details about how amounts are determined, see Insurance Remaining Calculations. This area displays the Discount Plan Grid (see below) instead for patients assigned a Discount Plan.
Discount Plan Grid
The lower-right area displays Discount Plan benefits at a glance when a patient is assigned to a Discount Plan Subscriber Edit. If a patient is not assigned a Discount Plan, the Insurance Grid (see above) is displayed in this area.
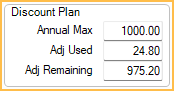
- Annual Max: The annual max set at the Discount Plan .
- Adj Use: The total amount of discount plan adjustments completed for the current benefit period for the patient.
- Adj Remaining: The discount amount the patient has remaining before reaching the annual max. Annual Max - Adj Used = Adj Remaining.
Note
The text field at the bottom of the window is the treatment plan note. If the Note Output Text Field is added to the default Treatment Plan Layout, this text is displayed when saving, printing, or sending treatment plans..

Uses the Default Note set in Preferences, unless the Note has been edited. Any changes made to the note here are saved for the selected treatment plan. This text box supports Right-Click Options.
Good Faith Estimates / No Surprises Act
Open Dental does not have a feature to automatically print a Good Faith Estimate (GFE) with all of the required fields. We believe that most patients are going to be fine with a copy of their Treatment Plan.
The missing fields are not very helpful and are, for each procedure, Provider Name, NPI Number, Taxpayer ID, ICD code, service code type, and service code number. The burden of adding the features needed would compete with other features and Open Dental customers have not shown the demand (see Feature Request 15447).
The rare patient that demands these extra fields along with the many required disclaimers can be given the filled out form from the CMS link below, as you have three days to provide it. https://www.cms.gov/nosurprises/consumers/understanding-costs-in-advance.
Open Dental and the ADA both indicate (https://adanews.ada.org/ada-news/2022/march/ada-addresses-no-surprises-act-questions/) that other parts of the act do not apply to dentists in most cases, only to Good Faith Estimates for cash patients. We do not believe that statements would need to be modified, Treatment Plans would need a new version for GFE requests.