

Planned Appointments
Set up and track a patient's next appointment for treatment planned procedures (e.g., RCT, crowns, fillings) from the Chart Module using Planned Appointments.
In the Chart Module, click the Planned Appts tab.
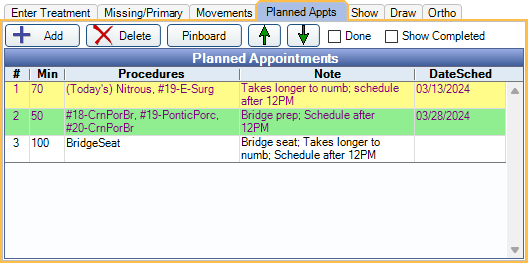
- Add: Create a new Planned Appointment. The Edit Appointment window opens.
- Delete: Delete the selected Planned Appointment(s). This does not affect scheduled appointments.
- Pinboard: Send the selected appointment(s) to the Pinboard. The Appointments Module opens so users can schedule Planned Appointments.
- Up/Down: Move the selected Planned Appointment up or down in the list.
- Done: Check this box to delete all Planned Appointments. This should be done once all Planned Appointments have been completed.
- Show Completed: Check to show completed Planned Appointments. Resets to unchecked when Open Dental is restarted. Planned appointments are considered complete once an attached appointment is Set Complete or all procedures on the Planned Appointment have been set complete.
Double-click an existing Planned Appointment to edit.
Planned Appointments Grid: Displays existing Planned Appointments.
- #: Order of the Planned Appointment in the list.
- Procedures: Procedures attached to the Planned Appointment.
- Note: Appointment note.
- DateSched: Date of the linked scheduled appointment. DateSched is populated once a linked procedure is attached to a scheduled appointment. If procedures on the planned appointment are split to multiple scheduled appointments, the date for the appointment most recently added to the schedule is shown.
Background and text color of entries is determined by Definitions: Prog Note Colors.
Creating a Planned Appointment
To prompt users to create a Planned Appointment for procedures that are treatment planned today and are not in Diagnostic, DiagnosticXray, or RoutinePreventative E-Benefit Insurance Categories, enable the Prompt for Planned Appointment preference.
Create a Planned Appointment from the Chart Module:
- Enter Treatment to be attached to the Planned Appointment.
- Click +Add. Edit Appointment is opened and the treatment planned procedures are listed under Procedures on this Appointment.
- Highlight the procedures to attach to the Planned Appointment.
- Optional: If Lab Cases need to be attached, click Lab in the right panel. Select the Lab Case or create it if needed. Attached Lab Cases are automatically attached to the appointment when scheduled.
- Click Save.
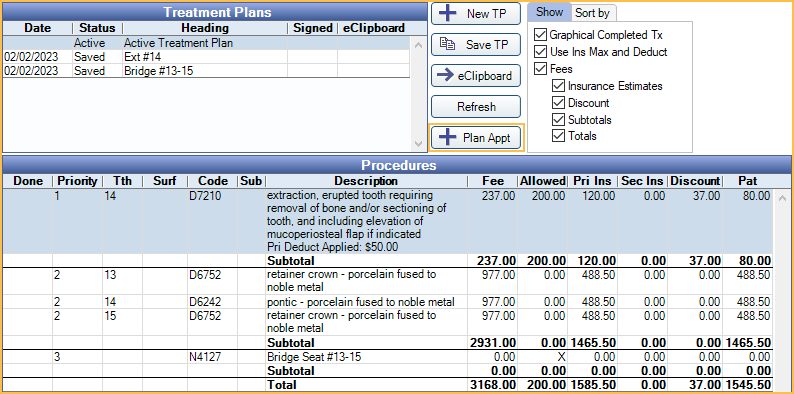
- Select treatment planned procedures to be attached to the appointment.
- Click +Plan Appt. Edit Appointment is opened and the previously selected treatment planned are attached the appointment under Procedures on this Appointment. Select additional procedures to attach to the appointment if necessary.
- Optional: If Lab Cases need to be attached, click Lab in the right panel. Select the Lab Case or create it if needed. Attached Lab Cases are automatically attached to the appointment when scheduled.
- Click Save.
Scheduling a Planned Appointment
Scheduling from Front Office:
- Usually, the chairside assistant or provider enters the Planned Appointment while charting treatment, then sends the patient to the front desk for scheduling.
- In the Appointments Module, select the patient.
- Click +Make Appt or Pat Appts. Appointments for Patient opens. The Planned Appointment is in the appointment list just like any other appointment, except it has no date or time.
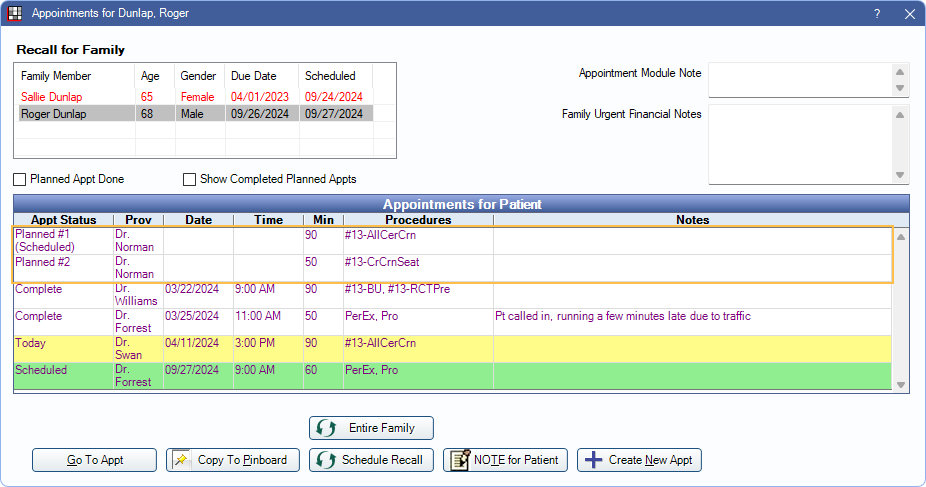
- This window lists the patient's planned, scheduled, broken, unscheduled, and completed appointments.
- Show Completed Planned Appts: Check to show Planned Appointments marked complete.
- Planned Appt Done: This box reflects the value of the Done box in the Chart Module, Planned Appt tab. When checked, this notifies scheduling that the next appointment will be a recall, not a restorative procedure. If unchecked, there may be a Planned Appointment.
- Select the Planned Appointment to schedule.
- Click Copy to Pinboard.
- Drag the appointment to the schedule.
- Select the Planned Appointment from the Planned Appts tab in the Chart Module.
- Click Pinboard.
- The Appointments Module is opened and the appointment is be copied to the pinboard.
- Drag the appointment to the schedule.
- The new scheduled appointment duplicates the procedures and length of the Planned Appointment. The Planned Appointment itself remains in the Appointments for Patient list until its scheduled appointment is marked complete, or until it is deleted from the Planned Appts tab in the Chart Module. In the Chart Module, Progress Notes, scheduled appointment and associated Planned Appointment always show next to each other regardless of date.
- If a patient leaves the office without making an appointment, or if they cancel at a later date, use the Planned Appointment Tracker to track and schedule planned treatment.
- Once a Planned Appointment has been scheduled, changes should be made on the scheduled appointment, not the Planned Appointment. Changes made to the Planned Appointment are not reflected on the scheduled appointment.
Typical Workflow
- While the patient is in the chair, the assistant or provider enters the treatment planned procedures in the chart.
- The assistant or provider creates a Planned Appointment for the next appointment, attaching the treatment planned procedures, notes, additional time.
- The patient goes to the front desk to schedule. The front desk sees the Planned Appointment in the Appointments for Patient window, copies it to the Pinboard and schedules the next appointment.
- The patient comes in for next appointment. The provider verifies that planned procedures match what is scheduled.
- When the planned treatment is finished, the provider or assistant sets the appointment complete (this also designates the Planned Appointment as complete but does not delete it).
- Determine if more work is needed.
- If more treatment is needed, enter another Planned Appointment.
- If there is no additional planned treatment, mark Done. This deletes all Planned Appointments and indicates to the front desk that there is no Planned Appointment (Planned Appt Done is checked on the Patient Appointments window).
- Creating more than one Planned Appointment is allowed, but because plans change, it is often more efficient to only enter Planned Appointments that are ready to be scheduled. If users do enter multiple Planned Appointments, it can be hard to accurately predict the procedures, and thus staff may need to frequently revise the Planned Appointments if procedures change. We recommend using Treatment Plans to outline a course of treatment while using Planned Appointments to communicate which appointments are ready to schedule.
- Hygiene appointments (e.g., cleanings) should not be entered as Planned Appointments. Instead use Schedule Recall in the Patient Appointments window if ready to schedule. Use Recall List to track appointments that still need to be scheduled.
- If there are no computers in the operatories, Planned Appointments can be ignored. Instead schedule the next appointment using the standard procedure as a guideline.
After the Planned Appointment
When treatment is complete: The Planned Appointment should exist until scheduled treatment is complete so that cancellations or no-shows can be tracked in the Planned Appointment Tracker. Once complete, planned appointments are also marked complete and won't show in the tracker. Deleting Planned Appointments is optional.
Deleting Planned Appointments : Deleting Planned Appointments permanently removes them, but does not affect any scheduled or completed appointments. To delete all Planned Appointments, mark Done. This clears the list and also checks the Planned Appt Done box on the Appointments for Patient window. To delete selected Planned Appointments only, click Delete. This does not affect the Planned Appt Done box.