

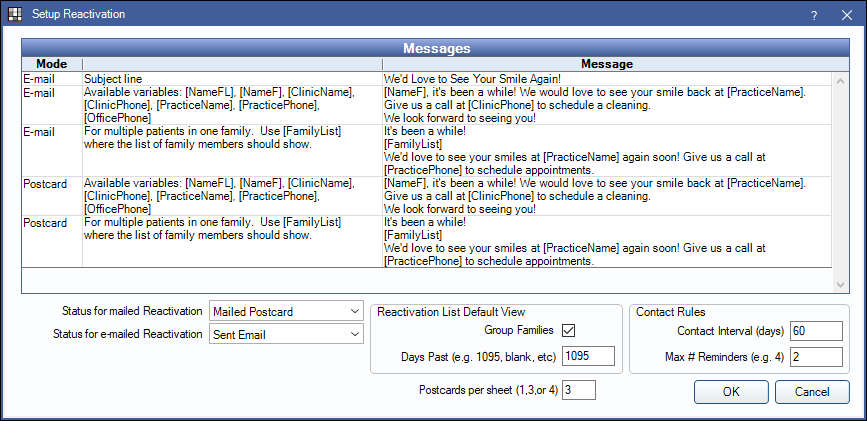
Setup Reactivation
Use the reactivation setup window to determine your preferred settings for the Reactivation List.
In the Main Menu, click Setup, Appointments, Reactivation.
See Reactivation List.
Reactivation must be enabled in Show Features for this window to be available.
Reactivation Messages
The Messages grid lists the email subject and body and postcard message for reactivation messages sent from the Reactivation List.
- Mode: The method of delivery (email or postcard).
- Second Column: General guidance about the message and its use.
- Message: The message text. Blank by default.
The bracketed text are variables which pull information directly from the database.
Available variables:
[NameFL]: Patient first and last name.
[NameF]: Patient first name only.
[FamilyList]: List first name and recall due date of all family members (if Group Families is selected).
[ClinicName]: Clinic name (patient's default clinic). If Clinics is not enabled, uses the Practice Name in Practice Setup instead.
[ClinicPhone]: Clinic phone number. If Clinics is not enabled, uses the Practice Phone in Practice Setup instead.
[PracticeName]: Practice name.
[PracticePhone]: Practice phone.
[OfficePhone]: Uses clinic phone number if available, otherwise inserts practice phone.
Reactivation Status Options
The status options determine which recall status is automatically applied when a reactivation message is sent.
Customize options in Definitions: Recall / Unsched Status.
Status for mailed Reactivation: The status applied when a recall postcard is printed.
Status for e-mailed Reactivation: The status applied when a recall reminder is emailed.
Reactivation List Default View
The following options affect what shows in the Reactivation List by default.
Group Families: Determines default setting for grouping families.
- Checked: Families will group together.
- Unchecked: Families will not group together.
Days Past: Determines the default Start Date.
Contact Rules
Determines the rules for contacting patients on the Reactivation List.
Contact Interval (days): Number of days between contact for a patient.
Max # Reminders (e.g., 4): Maximum attempts allowed to contact a patient.