

Site List
In the Main Menu, click Lists, Sites.
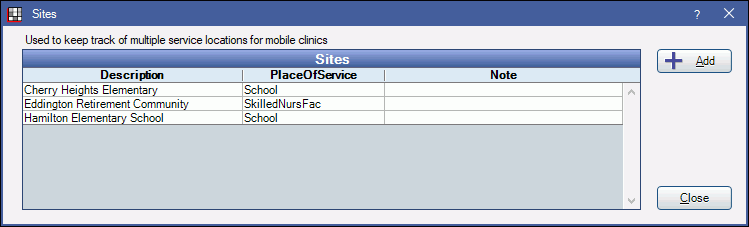
The Site List is a list of sites used in Public Health and by mobile clinics to track treatment performed off-site at grade schools, nursing homes, etc. Sites is only available when Public Health is enabled in Show Features.
Sites can be assigned to patients and to procedures (Procedure - Misc Tab). If a default site is assigned to a patient, the site will automatically be assigned to all the patient's future procedures. Changing the patient's default site will not affect previously charted procedures.
Optionally, enable Show Site in Preferences to display the patient's assigned site in the main title bar of Open Dental.
Sites should not be used to separate multiple office locations/mobile units in a practice. Use Clinics instead. Clinics and sites can be used together. For example, if there are multiple mobile units, each mobile unit would be a clinic, and each location where they park to provide treatment would be a site.
Add or Edit a Site
Click Add or double-click an existing site to edit.
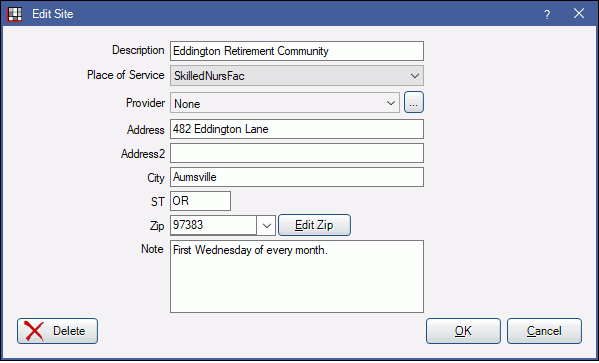
- Description: Enter the site name.
- Place of Service: Click the dropdown to select the default place of service on claims when this site is associated to a procedure (see Claim). When submitting e-claims in the X837D_5010_Dental format, the place of service cannot be office and the site provider cannot be the same as the billing provider.
- Provider: Click the dropdown or [...] to select a provider. Click None to clear a selection. The selected provider determines the NPI number submitted in the e-claim, using the X837D_5010_Dental format, when this site is associated to a procedure on the claim. To send the site's NPI number, first create a provider for the site, mark it as not a person then assign it to the site.
- Address, City, St, Zip: Enter the site's address, city, state and zip.
- Notes: Enter any site notes.
Claim Details
The process for adding sites to a claim varies depending on whether you send claims electronically or via paper. If claims are only sent electronically, there is no need to follow the process for using paper claims.
For Electronic Claims Only - Sending the Site's Place of Service, NPI#, and Address:
- Go to Lists, Providers. Create a new provider for the site. Enter the following:
- Last Name (the site name)
- Abbreviation
- National Provider IDNote: If you are not using the NPI of the Site where treatment is performed, enter the appropriate NPI (which may be the treating provider's NPI).
- Check the box for Not a Person
- Go to Lists, Sites. Add or edit the site and set the following:
- Assign the Provider (created in Step 1)
- Set the Place of ServiceNote: The place of service on the claim cannot be Office, and the site provider cannot be the same as the billing provider
- Assign the Site to at least one of the billable procedures. See Procedure - Misc Tab.
- Create the claim and send it.
For Paper Claims Only - Sending the Site's Place of Service, NPI#, and Address:
- Go to Lists, Providers. Create a new provider for the site. Enter the following:
- Last Name (the site name)
- Abbreviation
- National Provider IDNote: If you are not using the NPI of the Site where treatment is performed, enter the appropriate NPI (which may be the treating provider's NPI).
- Check the box for Not a Person
- Go to Lists, Sites. Add or edit the site and set the following:
- Assign the Provider (created in Step 1)
- Set the Place of Service
- Create a new claim form for each Site location, manually adding text fields for boxes 54 and 56 as appropriate for the site.Note: Editing Claim Forms should be done with extreme caution. The recommended method for sites is to:
- Duplicate an existing claim form.
- Change the description/name of the duplicated claim form so it is clear which Site it is used for.
- Remove the existing fields located in boxes 54 and 56 (for the ADA2012 claim form).
- Click Add on the Claim Form Edit window.
- Type in the required information for the site in to the Format String and select Fixed Text for the Field Name. You will need to add one Fixed Text Fields to account for each line of information you want to add, so you would need to add multiple lines for an address.
- Create the claim, change the Claim Form at the top of the Edit Claim window to match the Site, then Print it.