

Blockouts
Blockouts are visual indicators on the schedule that can be used to indicate times for lunches, meetings, specific Appointment Types, etc.
In the Appointments Module, Blockouts show as colored areas.
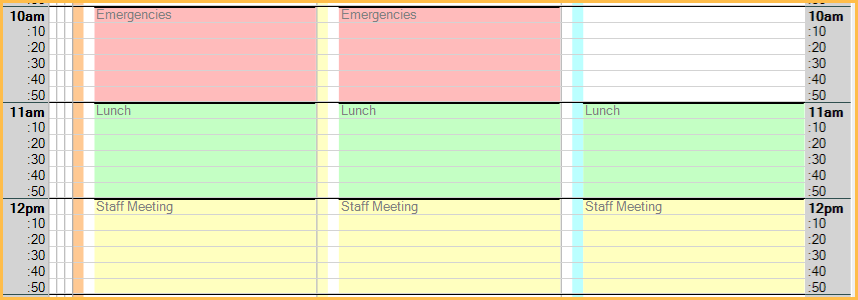
Blockouts can allow scheduling appointments over them or can block scheduling an appointment.
The Blockouts permission is required to add, edit, cut/copy/paste, and delete Blockouts that are not flagged as Disable Cut/Copy/Paste (DC) or No appointment scheduling (NS). Users without the permission can only add, edit, and delete Blockouts flagged as DC and NS.
Blockouts cannot overlap. When adding a new Blockout that would overlap an existing Blockout, there is a warning that Blockouts cannot be overlapped or there is a prompt to remove the existing blockouts. This behavior is determined by Allow 'Block appointment scheduling' Blockouts to replace conflicting Blockouts in Preferences.
Set up and customize Blockout Types in Definitions: Blockout Types. Define the font color in Definitions: Appointment Colors. To use outlines instead of solid blocks of color, disable the Use solid Blockouts instead of outlines on the Appointments Module preference.
To view or select a Blockout option, right-click on the operatory in the schedule.
- Edit Blockout: Change an existing Blockout. Opens Edit Blockout window (see below).
- Cut Blockout: Remove an existing Blockout from the schedule, but retain it in memory.
- Copy Blockout: Copy an existing Blockout to the clipboard.
- Paste Blockout: Insert a cut or copied Blockout in the time and operatory indicated by the mouse.
- Delete Blockout: Permanently remove a Blockout.
- Add Blockout: Create a new Blockout. Opens Edit Blockout window (see below).
- Blockout Cut-Copy-Paste: Quickly copy and paste Blockouts by day or week. See below.
- Clear All Blockouts for Day: Remove all Blockouts for the current day. There is a confirmation message before Blockouts are cleared. This option is not available when the Clinics feature is enabled.
- Clear All Blockouts for Day, Op only: Removes all Blockouts for the day in the selected operatory only. There is a confirmation message before Blockouts are cleared.
- Clear All Blockouts for Day, Clinic only: Removes all Blockouts for the day for the selected clinic only. There is a confirmation message before Blockouts are cleared.
- Edit Blockout Types: Quickly open Definitions: Blockout Types to customize Blockout Types.
Edit Blockout
On the appointment schedule, right-click on a time block in an operatory, then click Edit Blockout or Add Blockout. Edit Blockout is only enabled when right-clicking on an existing Blockout.
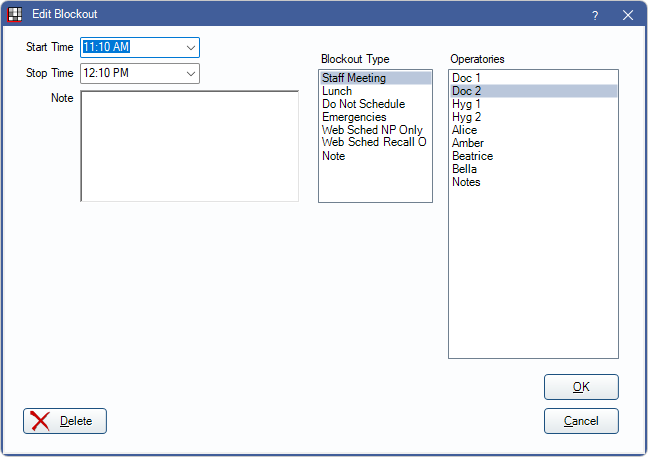
Start/Stop Time: The time defaults to start where the mouse was when right-clicking and end one hour later. Manually change times or click the dropdown to select an option. 30-minute increments are not required when entering the time manually. If manually entering, use the format 00:00 AM.
Note: Optional text that shows under the Blockout label. This text box supports Right-Click Options.
Blockout Type: Determines the Blockout text, scheduling and cut-copy-paste options, and color. Customize options in Definitions, Blockout Types.
Operatories: The operatories where the Blockout is added. To select multiple Operatories, press Ctrl while clicking. If using Clinics, only operatories assigned to the clinic selected in the Main Menu are options.
When Blockouts with the same type are added to multiple operatories at once, they become connected. Deleting or replacing a blockout in one operatory also deletes or replaces any Blockouts that are connected.
Blockout Cut-Copy-Paste
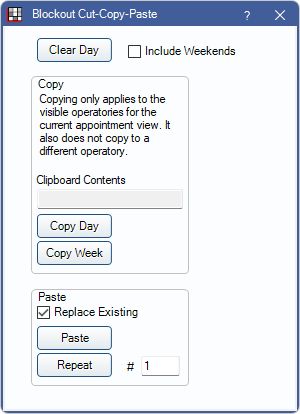
Use this tool to copy and paste Blockouts for a week or day. Changes only apply to the visible operatories for the current Appointment View. Blockout Types with Disable Cut/Copy/Paste checked in Definitions are not included.
- In the Appointments Module, move the schedule to the day to be edited.
- Right-click the schedule area and select Blockout Cut-Copy-Paste.
- Select an option. Clear Day: Remove all Blockouts on the selected day (daily or weekly view).Note: When Clinics is enabled Clear Day only clears the day of the selected clinic.
Copy Day/Paste: Once one day's Blockouts are set up, copy and paste it to other days.
- Click Copy Day. The window is closed.
- In the schedule area, right-click on the day that the Blockouts are to be added and select Blockout Cut-Copy-Paste again. The copied date appears in Clipboard Contents.
- Click Paste.
Copy Week/Paste: Once an entire week's Blockouts are set up, copy and paste to other weeks.
- To include weekends in the copy, check Include Weekends.
- Click Copy Week. The window is closed.
- In the schedule area, right-click on the day that the Blockouts are to be added and select Blockout Cut-Copy-Paste again. The copied date range appears in Clipboard Contents
- Click Paste.
Copy/Repeat: Copy and paste one day or one week repeatedly into the future.
- Copy the day or week.
- In the schedule area, right-click on the day that the Blockouts are to be added and select Blockout Cut-Copy-Paste again.
- In the # box next to Repeat, enter the number of days/weeks in the future Blockouts are to be pasted (e.g., 365 days or 52 weeks).
- Click Repeat.
Replace Existing: If checked, the day or week being pasted/repeated replaces any existing Blockouts. If unchecked, existing Blockouts are not replaced, and the paste process stops and goes no further than the first conflicting Blockout.
Hint: To clear multiple days or weeks, create one blank day or week, make sure Replace Existing is checked, then Copy/Repeat.
Block Scheduling
Block Scheduling can be set up to be enforced by Appointment Types:
- Create Blockout Types in Definitions: Blockout Types.
- Optional: in Appointment Types, enable New appointments prompt for appointment type. This ensures users are prompted to select an Appointment Type when creating a new appointment.
- Click add to create new Appointment Types and assign to Blockout Types or double-click existing Appointment Types to edit:
- In the Appointments are allowed on these Blockout Types, highlight the Blockout Types to allow the Appointment Type to be Scheduled.
- To match the appointment color with the Blockout, assign a color to the Blockout Type.
- Add Blockouts to the Appointments Module schedule.
- After setting up Blockouts, use the Blockout Cut-Copy-Paste to quickly copy Blockouts to another day or week.
Once Blockouts are created and Appointment Types are set up, users can only place appointments on the Blockouts where the Appointment Type is allowed or on areas of the schedule where there is no Appointment Type. Appointments with no Appointment Type can be scheduled on any Blockouts that allow scheduling.