

Graphical Tooth Chart
The Graphical Tooth Chart visually displays the patient's teeth, as well as treatment that has been performed, is planned, or has been referred out.
In the Chart Module, at the upper left, is the graphical tooth chart.
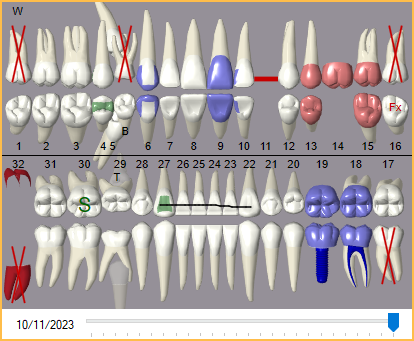
To select a tooth, click the tooth or tooth number. Click a selected tooth again to deselect. Click and drag to quickly select multiple teeth.
Drag the slider bar under the chart to show historical changes to the patient's tooth chart. Procedures that were originally in the Treatment Planned procedure status appear on the chart as of the Procedure Date TP. Other statuses appear as of the Date Entry.
Tooth Numbering: Tooth numbering displayed on the Graphical Tooth Chart is determined by the Tooth Nomenclature set in Preferences. Open Dental supports 4 different tooth numbering systems:
- Universal (Common in the United States, 1-32): 1-32 for permanent teeth. A-T for primary teeth. Supernumerary teeth use 51-82 and AS-TS. For permanent supernumerary teeth add 50 to the tooth number (tooth 1 = 51). For primary supernumerary add S to the tooth number (tooth A = AS).
- FDI Notation (International, 11-48): 11-48 for permanent teeth. 51-85 for primary teeth. Not all numbers in these ranges are valid. For foreign users, supernumerary teeth can be entered as 99.
- Haderup (Danish)
- Palmer (Ortho)
Tooth Graphics:
- Supernumerary Teeth are not displayed on the Graphical Tooth Chart, so procedures charted to supernumerary teeth are not shown. Supernumerary teeth can be manually drawn on the Graphical Tooth Chart using the pen tool from the Draw Tab.
- Teeth can be selected from the Graphical Tooth Chart to chart procedures from the Enter Treatment tab or mark teeth missing/not missing from the Missing/Primary Teeth tab.
- A procedure code's paint type and treatment area determine the graphic used in the tooth chart. Some treatment areas show no graphic (e.g., mouth). See Edit Procedure Code to determine the paint type and treatment area used for a specific procedure code.
- Colors are dependent on:
- Procedure status (treatment planned, complete, existing other provider, existing current provider, referred, condition).
- The colors set in Definitions: Chart Graphic Colors.
- The status of Chart graphic color distinguishes current provider in User Settings for the currently logged-on user.
- Color Override set for a procedure code, if any.
- If Chart Graphic Colors are changed, we recommend changing Definitions: Prog Note Colors to match. By convention, procedures that use metal are a dark color, while those that use ceramic, porcelain, or plastic are a light color. When a color override is present, color does not indicate status.
- Procedure statuses shown on the Graphical Tooth Chart depend on the settings enabled for the selected Chart View.
- Teeth can be moved on the tooth chart using the Movements tab.
Tooth Chart Dropdown
In the Chart Module, in the toolbar, is a Tooth Chart dropdown.

Show Big: Open the Big Graphical Tooth Chart.
Save the Tooth Chart: Save a copy of the Graphical Tooth Chart in the Imaging Module to the Image Category marked for Graphical Tooth Charts.
Troubleshooting
If treatment is displaying on the Graphical Tooth Chart that is no longer relevant or no longer in place (e.g., removed crown) check Hide Graphics in Procedure Info. Procedures are no longer displayed on the Graphical Tooth Chart.