

Schedule Edit
In the Main Menu, click Setup, Schedules. Double-click a day to edit.
Alternatively, in the Appointments Module, Employee or Provider tab, double-click anywhere.
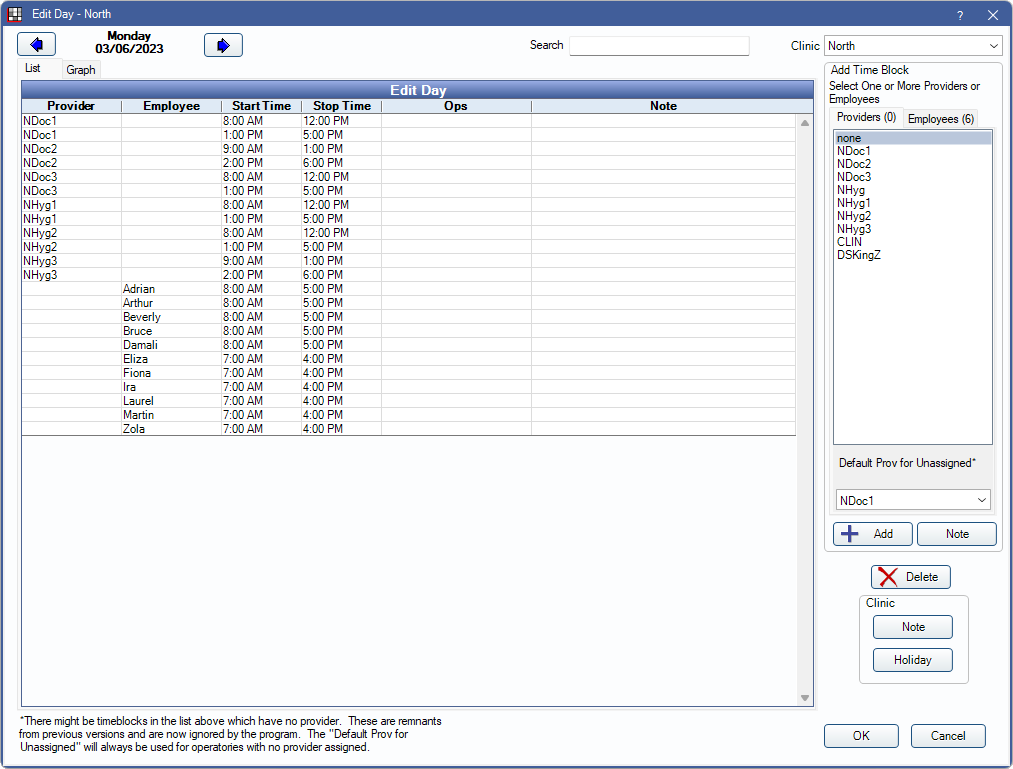
The Edit Day window in Schedule Setup lists all provider and employee time blocks scheduled for one day. From here users can add, edit, and delete time blocks, as well as add holidays, staff vacations, and days the office is closed.
Filters
Use the options at the top to change or filter schedule results.
- Date: The upper left corner shows the selected day. Click the arrows to move forward or back one day.
- Search: Search the day's schedule by employee or provider name.
List Tab / Edit Day Grid
The List Tab shows all provider and employee time blocks as rows (start/stop time, operatory and any notes) and any practice notes. The list is sorted first by practice notes, then by provider, then by employee. Double-click a row to edit.
Graph Tab
The Graph Tab shows a visual representation of the work schedule for a day.
For more information, see Schedule Graph.
Add a Time Block
Use the panel on the right to add time blocks.
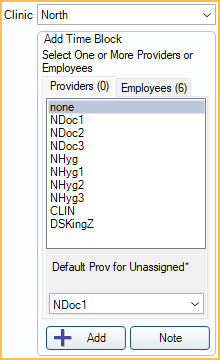
- Clinic: When adding a time block, holiday, or clinic note, first select the clinic the time block applies to.
- Providers: Lists providers who have access to the clinic. When adding a time block, first highlight the providers it will apply to. To select multiple providers, click and drag, or press Ctrl or Shift while clicking. The number of providers currently selected appears in parentheses.
- Employees: Lists employees who have access to the selected clinic. When adding a time block, first highlight the employees it will apply to. To select multiple employees, click and drag, or press Ctrl or Shift while clicking. The number of employees currently selected appears in parentheses.
- Default Prov for Unassigned*: Select a provider to use for open hours for any operatories with no assigned or scheduled provider. If there is a time block for the selected provider with operatories set to not specified, their hours are used.
- Add: Add time blocks for the selected providers and employees. See detailed instructions below.
- Note: Add a specific note for the selected providers and employees. This text box supports Right-Click Options. These notes appear next to the employee/provider's scheduled hours in the Appointments Module under the Employee tab (Notes column).
Delete a Time Block
Delete: Remove a time block.
- Select the desired time blocks to delete before clicking Delete.
- If there are no time blocks selected when clicking Delete, all time blocks will highlight.
- If deleting via the Graph tab, the entire day's schedule will be deleted.
- After clicking delete, users will receive a popup to confirm the deletion. Click Yes to delete time blocks for providers. Click No to cancel the deletion.
Notes and Holidays
Holidays and notes show as their own row under the Edit Day grid and will only show on the schedule window if Show Practice Holidays and Notes or Show Clinic Holidays and Notes is also selected. Shows as Practice when Headquarters is selected. Shows as Clinic when a clinic is selected.
- Note: Add a general note, e.g., about staff vacations or days the office is closed.
- Holiday: Add a holiday to the schedule.
If Headquarters is selected under clinics, any holidays or notes will apply to all clinics. If a different clinic is selected, the note will apply to the selected clinic only.
OK + Goto Schedules: Only visible when opened via the Employee or Provider tab in the Appointments Module. Saves changes and opens the main schedule window.
Add to Schedule
To fill the schedule, begin by entering provider and employee time blocks for one day. Once one day is set up as needed, users can quickly fill the schedule using copy/paste/repeat from Schedule Setup.
The date shows in the upper left. Click the left or right arrow to move back or forward one day. Currently scheduled providers and employees for the day show under the List tab, Edit Day. Double-click a row to edit a schedule. Usually time blocks are added/edited using the List tab. To add via the Graph tab, see Schedule Graph.
- Select a Clinic to associate with the schedule.
- Highlight the providers and/or employees the time block applies to. In each tab, only providers/employees that have access to the selected Clinic are listed. To select multiple names, click and drag, or press Ctrl or Shift while clicking. The number of selected providers/employees shows in parentheses.
- Click Add.Note: If both providers and employees are selected, a confirmation message displays. Click OK to proceed.
- In the Edit Schedule window, use the dropdowns to select the Start and Stop time or type a time using the same format (00:00 AM).
- (optional) If providers are not assigned to specific Operatories, they can be scheduled to operatories. This overrides any assigned provider in Operatory Edit and affects Appointment Search. This is useful, and generally only necessary, when providers share operatories.
- If an operatory is assigned to a time block, a colored vertical Time Bar will show in the Appointments schedule to the left of the time block (operatory time bar). Only one dentist timebar and one hygienist timebar can show simultaneously.
- If using Clinics, only operatories assigned to the selected clinic are options. If Headquarters is selected, all operatories are listed.
- Enter any notes specific to this time block. This text box supports right-click options (Right Click Text Box). These notes will appear next to the employee/provider's scheduled hours and under the Appointments Module, Employee tab (Notes column).
- Click OK. If an operatory conflict or overlap is detected, a confirmation message will show. Click Yes to proceed or No to return to the Edit Schedule window and repeat previous steps to correct the schedule as needed. For each time block created, a row is listed under Edit Day.
- Click OK on the Edit Day window to save and close.
Examples
Simple Schedule, Repeats Weekly:
- Set up the schedule for each day of the week as needed.
- From the Schedule Setup window, copy the week that has been set up.
- Enter a number in the Repeat # field. (For example, to setup the schedule for a year, type 52 into this box to repeat the schedule for 52 weeks)
- Click the date to start pasting the schedule.
- Click Repeat to paste the schedule.
Schedules that Alternate Weekly:
- Set up the schedule for one week as needed.
- Follow steps 2-5 from Simple Schedule, Repeats Weekly above.
- Alter one of the weeks to set up the alternating week's schedule.
- From Schedule Setup, Copy the alternating week's schedule.
- Select a date to paste the alternating schedule.
- Click Paste to paste the alternating schedule for one week.
- Repeat steps 5-6 as needed for each week of the alternating schedule.
Taking every third Friday off:
- Set up the standard schedule as needed using the steps from Simple Schedule, Repeats Weekly or Schedules that Alternate Weekly steps above.
- From Schedule Setup, double-click the Friday off.
- Copy the day, then paste one day at a time to the Fridays taken off.
Removing a Provider or Employee from the Schedule
- Double-click a day the provider or employee is currently on the schedule to open the Edit Day window.
- Select the provider or employee's time blocks.
- Click Delete.
- Click OK to close the Edit Day window and save the updated schedule.
- Repeat steps 1-4 for any other days of the week the provider or employee is scheduled.
- Once the provider or employee is removed from the schedule for a week and any alternating weeks, follow the steps above to copy out the schedule as needed using the steps from Simple Schedule, Repeats Weekly or Schedules that Alternate Weekly.
Enter Holidays
A holiday is an officially recognized holiday, like Christmas, not a day that the office is simply closed or the dentist is on vacation. The holiday text will show in the day's cell on the schedule grid and in Graph View. In the Appointment schedule, the day's background will be the color set in Definitions: Appointment Colors, Holiday. To notate the holiday on the appointment schedule, add Blockouts. Holidays are considered when calculating lab case due dates.
- Double-click on the day to open the Schedule Edit window.
- If needed, remove all time blocks for the day. To delete multiple time blocks at once, press Ctrl+click to highlight, then click Delete.
- In the Practice or Clinic area, click Holiday.
- Enter the Holiday text in the Note box, then click OK.
Enter Vacations/Office Closed
To enter information about an employee or provider's vacation or days the office is closed, enter a note. The note text will show in the day's cell on the schedule grid and in Graph View. It will not show in the Appointment module.
- Double-click on the day to open the Edit Day Window.
- If needed, remove all time blocks for the day. To delete multiple time blocks at once, press Ctrl+click to highlight, then click Delete.
- In the Practice or Clinic area, click Note.
- Enter a description (e.g., Dr. Smith Vacation, Office Closed), then click OK.
To add holiday or vacation hours to an employee's time card, see Manage Time Cards.