

Waiting Room
In the lower right corner of the Appointments Module is the Waiting Room. It is used to track patients who have arrived for their appointment.
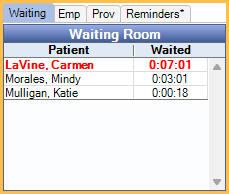
Patients who list in the waiting room have a Time Arrived, but not a Time Seated entry in the Edit Appointment window.
Automated entries for Time Arrived and Time Seated are triggered by the Confirmation Status on the appointment. Patients who self check-in using eClipboard are automatically entered in the Waiting Room.
Add Patient to Waiting room
- When the patient arrives, click on their appointment to select the patient.
- On the right, click the confirmation status abbreviation set for the Time Arrived trigger in Preferences (e.g., Arrived).
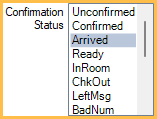
The patient then shows in the waiting room. - When patient is seated, select the status set for the Time Seated (in op) trigger (e.g., In Room). The patient no longer shows in the waiting room.
Alternatively, the appointment status can be changed from Edit Appointment.
Display Options
There are multiple settings that affect the waiting room.
- In Preferences:
- Set the Time Arrived trigger. The default is Arrived.
- Set the Time Seated (in op) trigger. The default is In Treatment Room.
- Waiting Room alert time in minutes, Waiting room alert color: Use text color to flag patients whose wait time exceeds a certain value.
- Filter the waiting room based on the selected appointment view.
- Refresh every 60 seconds. Keeps waiting room times refreshed.
- Set the Waiting Room Name Format in Appointment View Edit.
When using clinics, the patients that show in the waiting room are based on the clinic selected in the Main Menu. If Headquarters is the clinic, all patients waiting for all clinics show.
Technical Details
The Time Arrived Trigger uses the server time. The time waited uses the local workstation time. If the server time and workstation time do not match, the patient may not display properly in the Waiting Room.
Patients only appear in the Waiting Room if their appointment is scheduled for today and a Time Arrived was added today (either manually entered or added by Time Arrived Trigger). If a Time Arrived was added accidentally, (e.g., a patient was marked arrived a day early), the Time Arrived value should be removed from the appointment. It is also useful to set the confirmation status back to its previous state (e.g., Confirmed).