

Appointment View Edit
Customize Appointment Views to display preferred information in the Appointments Module.
In the Appointment View Setup window, double-click a view.
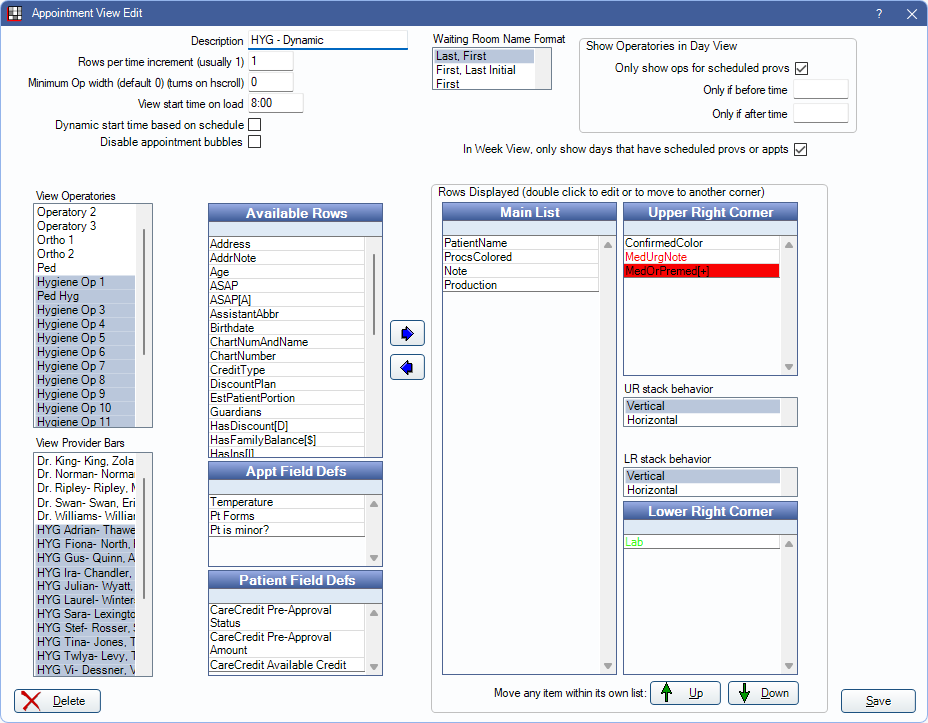
Options
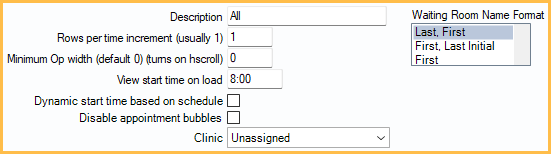
- Description: The identifying name of this Appointment View.
- Rows per time increment (usually 1): Affects the row height for time increments. Enter a number between 1 and 3.
- Minimum Op width (default 0) (turns on hscroll): Enter the minimum width of an operatory (in pixels). Appointments do not scale down below that width, and a horizontal scroll bar appears at the bottom if needed.
- View Start Time on Load: Set a fixed default start time. This option is only used when start times are not determined dynamically.
- Dynamic start time based on schedule: When checked, the schedule automatically scrolls to whichever comes first: the start time of the earliest appointment or blockout, or the scheduled start time of the earliest scheduled provider.
- Only providers in operatories included in the view are considered.
- Operatories not assigned a provider consider the default provider's Schedule.
- If no operatory has a scheduled provider or appointment, the View Start Time on Load value is used.
- When Open Dental is first launched, the appointment schedule automatically scrolls to the default start time based on the settings above. After Open Dental is launched, the scroll bar remembers the last position it was in and stays there when moving around the program.
- Disable appointment bubbles: Set whether or not the Appointment Bubble appears in this Appointment View when hovering over an appointment in the schedule.
- When checked, Appointment Bubbles do not appear when hovering over appointments.
- When unchecked, Appointment Bubbles appear when hovering over appointments.
- Disabling Appointment Bubbles is useful for privacy (so PHI is not visible) and can improve system performance.
- The default state of this setting is determined by Default appointment bubble to 'disabled' for new Appointment Views in Preferences
- Clinic: If using Clinics, select the Clinic associated with this view. The view is only available when this Clinic is selected in the Main Menu. Selecting Unassigned allows the view to be selected from Headquarters. Defaults to the Clinic selected on the Appointment Views window.
- Waiting Room Name Format: Set how name displays in the Waiting Room.
- Last, First: Displays patient's last and first name (e.g., Smith, John).
- First, Last Initial: Displays patient's first name and last initial (e.g., John, S).
- First: Displays patient's first name only (e.g., John).
Day View / Week View Options
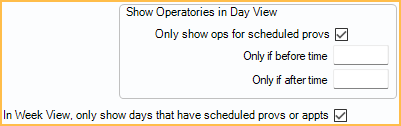
Show Operatories in Day View: Determine settings that affect the Appointment View when Day is selected.
- Only show ops for scheduled provs: Check this box to dynamically show Operatories based on provider schedules. Applies to Day View only.
- Only operatories selected in View Operatories are considered.
- For this feature to function correctly, it is recommended that all providers be scheduled in an operatory (Schedule Setup).
- If there is an operatory that does not have a provider scheduled, but there is a provider on the schedule assigned as the operatory's provider, the operatory is still displayed.
When Only show ops for scheduled provs is checked, the following additional options are available: - Only if before time: Show operatories for providers whose schedule starts and ends before this time.
- Only if after time: Show operatories for providers whose schedule starts and ends after this time.
In Week View, only show days that have scheduled provs or appts: When checked, days with no scheduled appointment or scheduled providers are hidden from the Appointment View when Week is selected. When unchecked, all days of the week (Monday - Sunday) are shown in Week view.
- Providers are considered scheduled if they have a schedule for the day and are the default provider for an operatory. Providers are also considered scheduled if they are assigned to an operatory in the schedule. See Schedule Setup Examples for additional information.
- Only provider schedules and appointments for the operatories in the view are considered.
View Operatories
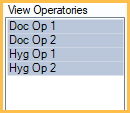
Select the operatories that show in the Appointment View. If using Clinics, only operatories associated with the assigned Clinic are listed. Click and drag or press Shift or Ctrl while clicking to select multiple operatories. At least one operatory must be selected. Sort order is based on Operatories order.
View Provider Bars
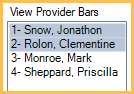
Select the provider Time Bars to show in the view. Time bars show on the left of the schedule in the appointment color of the provider.
Add Rows to the Appointment View
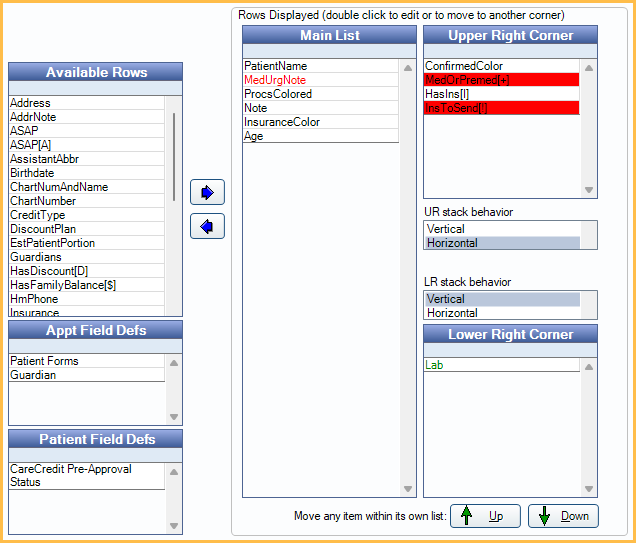
The information that displays on an appointment is determined by rows added to the view. Rows to left of the arrows (Available Rows, Appt Field Defs, and Patient Field Defs) are available to add to an Appointment View. Rows to the right of the arrows (Main List, Upper Right Corner, and Lower Right Corner) are items currently visible in the Appointment View.
Select a row, then use the left and right arrows to add it to or remove it from the view.
- Available Rows: See below for an explanation of each row item.
- Appt Field Defs: Displays Appointment Field Defs.
- Patient Field Defs: Displays Patient Fields. See below for additional details.
- Main List: Displays rows added to the Appointment View. These rows display in the center list of the appointment.
- Upper Right Corner: The fields listed appear in the upper-right corner of the appointment box. Whether the information is stacked vertically or horizontally is based on the UR stack behavior selection. It can be useful to organize data that displays as symbols in the upper right (e.g., I, A, [L]). Double-click an item to change its text/background color or to move it to a different location.
- Lower Right Corner: The fields listed here appear in the lower right corner of the appointment box. Whether the information is stacked vertically or horizontally is based on the LR stack behavior selection. Double-click an item to change its text/background color or to move it to a different location.
- To reorder rows, Select the row then use the Up and Down arrows to move it.
- Mobile: Only displays when ODMobile is enabled for the Practice or Clinic. Click to determine which fields show on appointments when viewed from an ODMobile device. See below for details.
Appointment View Item Edit
When a field has been moved from the Available Rows column, the text color or alignment can be edited.
To edit a field, double-click it. The Appointment View Item Edit window opens.
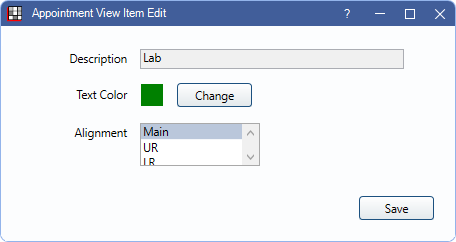
- Description: Name of the field. This value cannot be changed.
- Text Color: Click Change to change the Color of the text or row background, depending on the item and location.
- Alignment: Select where the field displays on the appointment.
- Main: Displays on the appointment in the center list.
- UR: Displays in the upper right of the appointment.
- LR: Displays in the lower right of the appointment.
Mobile Appointment View Edit
For ODMobile Feature users, click Mobile to set up the Appointment View for the mobile app.
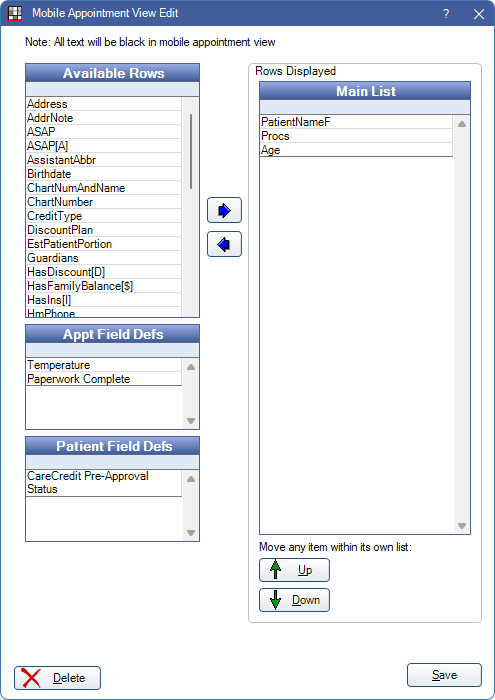
Use the Left and Right arrows to determine which Available Rows, Appointment Field Defs, and Patient Field Defs display in the Main List on appointments in ODMobile and ODTouch. Fields can only be displayed in the Main List.
Additional Information:
- Confirmed Color is not a listed option as it always displays in the upper-right corner of ODMobile and ODTouch appointments.
- The Lab row in mobile view only displays the first Lab Case attached to an appointment.
Available Rows
A list of available data that can be shown.
| Row Name | Description |
|---|---|
| Address | Patient address. |
| AddrNote | Address and phone note. |
| Age | As calculated on Edit Patient Information window. |
| ASAP | Display ASAP when the appointment status is ASAP. |
| ASAP[A] | Display A when the appointment status is ASAP. |
| AssistantAbbr | The assistant's abbreviation. Displays the first two characters of the assistant's first name entered in the Employees list. |
| Birthdate | As entered in the Edit Patient Information window. |
| ChartNumAndName | Chart number and patient last name, first name. |
| ChartNumber | Chart number only. |
| ConfirmedColor | Display a colored circle in the appointment box to indicate Confirmation Status. Define colors for each confirmation status in Definitions, Appt Confirmed. |
| CreditType | As entered in the Edit Patient Information window. |
| DiscountPlan | The patient's Discount Plan name. |
| EstPatientPortion | Estimated patient portion for attached procedures. (patient portion = gross production - estimated insurance write-offs - insurance estimates - discount plan discount). For estimates to calculate correctly you must chart the procedure from the Chart Module then attach them to the appointment. If procedures are added directly to the appointment, you must click into the Treatment Plan Module to update the estimates. |
| Guardians | Name of person marked as Guardian in Family Relationships. |
| HasDiscount[D] | Display D when patient has a discount plan. |
| HasFamilyBalance[$] | Display $ when there is a family balance on the account, regardless of pending insurance. |
| HasIns[I] | Display I when patient has insurance. |
| HmPhone | Home phone number. |
| InsToSend[!] | Display an exclamation point (!) on patient appointments when there are completed procedures within the last year that have not been sent to insurance. This shows for a patient if any family members have an unsent procedure. We recommend placing it in the Upper Right Corner. For this to show, also enable the Show ! on appts for ins not sent, if added to Appt View preference. The exclamation point won't show if a claim has been created for the completed procedure or the insurance estimate is $0. |
| Insurance | When in the Main List, displays primary and secondary insurance carriers attached to the appointment. Insured displays if the patient currently has medical insurance or other insurance that is not attached to the appointment (i.e., in the Edit Appointment window). |
| Insurance Color | When in the Main List, displays primary and secondary insurance carriers attached to the appointment with a colored background as set in Carriers. Insured displays if the patient currently has medical insurance or other insurance that is not attached to the appointment (i.e., in the Edit Appointment window) and no colored background is set. |
| IsLate[L] | Display [L] when a patient is late for an appointment. A patient is considered late if they have no time arrived entered on the Edit Appointment window or if the time arrived value is later than the appointment start time. |
| Lab | Show the status of Lab Cases. We recommend changing the text color to red as well. |
| LateColor | Indicate a patient is late for their appointment by changing the appointment's color. A patient is considered late if they have no time arrived entered on the Edit Appointment window or if the time arrived value is later than the appointment start time.
|
| MedOrPremed[+] | Display + to indicate patient has Premedicate checked, medical urgent notes, allergies, and/or problems |
| MedUrgNote | Medical Urgent Note entered in the Medical Chart. |
| NetProduction | Net production of procedures attached to the appointment. Net production is the amount remaining after estimated write-offs and adjustments are calculated. Add this field or Production to see the Daily Prod sum at the right of the Appointments Module. See for additional calculation details. |
| Note | The Appointment Note entered on the Edit Appointment window. |
| PatientName | The patient's last name, preferred name, first name, and middle initial. |
| PatientNameF | The patient's first name. |
| PatientNamePref | The patient's preferred name. |
| PatientWard | The patient's ward as entered in Edit Patient Information: Hospitals Tab. |
| PatNum | Patient number assigned by Open Dental. |
| PatNumAndName | Patient number and patient last name, first name. |
| PremedFlag | Display Premedicate when Premedicate is checked in the Chart Medical area. |
| Procs | List abbreviations for procedures attached to the appointment on a single line, separated by commas. Text wraps to next line if too long for a single line. |
| ProcsColored | See Proc Appt Colors. Can only display in the Main List. |
| Production | Show the sum of the fees for all procedures attached to the appointment for providers who have a provider time bar showing. Add this field or NetProduction to view to see the Daily Prod sum at the right of the Appointments module. See Production Totals. |
| Prophy/PerioPastDue[P] | Display P when a Prophy or Perio Special Recall type is overdue. |
| Provider | Displays providers on the appointment. |
| RecallPastDue[R] | Display R when any recall type (other than Prophy or Perio) is overdue. |
| TimeAskedToArrive | Display the time before the appointment that the patient has been asked to arrive to the office. See Time Ask to Arrive. |
| VerifyIns[V] | Display V when insurance has not been verified. Icon shows for patients using Insurance Verification Setup settings. |
| WirelessPhone | Patient wireless phone number. |
| WkPhone | Patient work phone number. |
Patient Field Defs
The available Patient Fields.
- CareCredit Pre-Approval Status: Displays the CareCredit Quickscreen status for the patient.
- Green circle: Patient is pre-approved.
- Orange triangle: Patient is unable to pre-approve.
- Blue square: Patient is a current CareCredit cardholder.
- CareCredit Pre-Approval Amount: Displays the CareCredit Quickscreen pre-approval amount for the patient. If this field is filled, CareCredit Available Credit displays as N/A.
- CareCredit Available Credit: Displays the CareCredit Quickscreen response for the patient's available credit. If this field is filled, CareCredit Pre-Approval Amount displays as N/A. Patient must already be a CareCredit cardholder for this field to fill.