

Fill Sheet
Sheets can be filled in, edited, signed from the Fill Sheet window.
In Patient Forms double-click an existing form to edit.
The Fill Sheet window will also open when:
- Clicking Add from the Patient Form window and selecting a sheet type to fill out a new form.
- Adding or editing a Patient Letter.
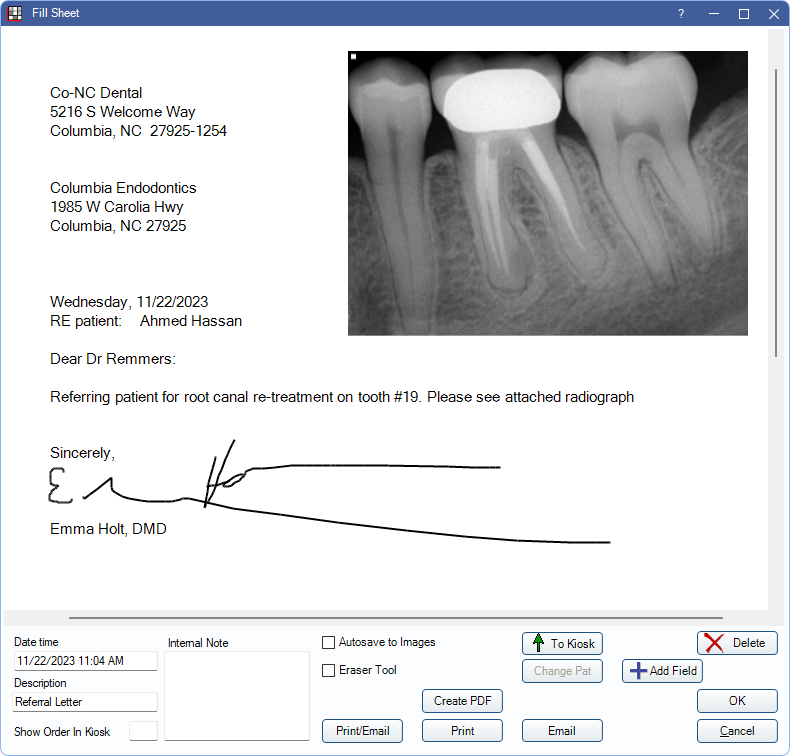
- Adding or editing a Referral Letter or Referral Slip.
- Adding or editing an Exam Sheet.
- Adding or editing a Lab Slip.
- Adding or editing a Public Health Custom Screening.
- Double-clicking an existing sheet from the Progress Notes section of the Chart Module.
- Double-clicking an existing sheet from the Communications Log section of the Account Module.
- Clicking View from the Statement Window (only includes limited options).
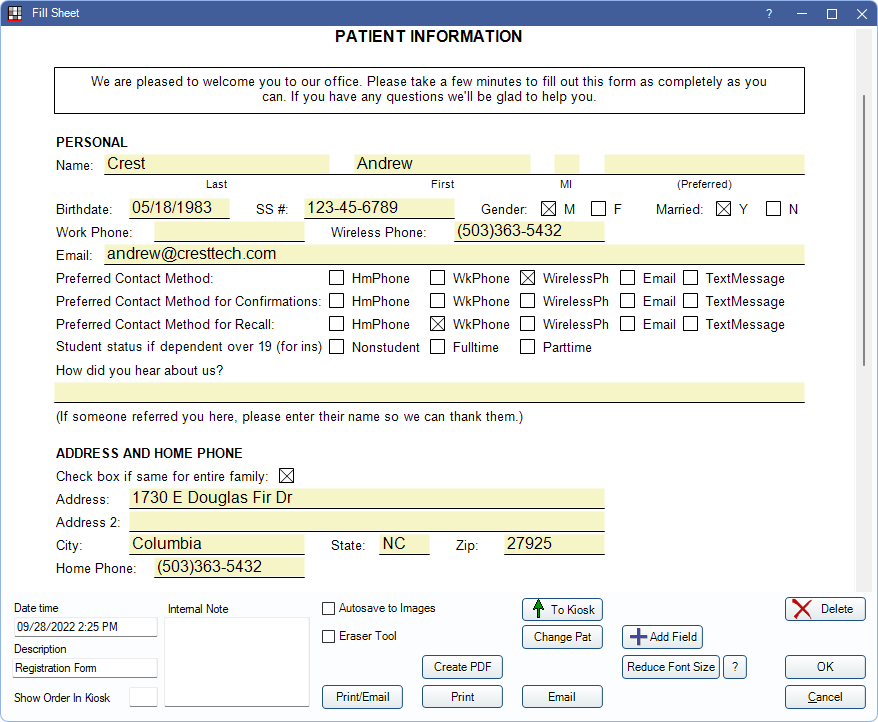
Above is an example of a patient registration form.
- All text in input text fields, output text fields, and static text fields is editable.
- Input fields are indicated with a light yellow background.
- If an Auto Note is assigned to the Sheet Input Field, click the field to fill out any Auto Note prompts.
- Right-click a field to insert a date, Auto Note, or Quick Paste Note.
- Checkboxes and radio buttons can be selected/deselected (toggle an X on or off).
- Signature boxes accept Electronic Signatures. Once signed, the date and time of the signature will show. If a signature is invalidated or cleared the date/time stamp is removed.
- To enter information on a combo box, there are two options:
- Click on the combo box and select from the dropdown list.
- On your keyboard, tab to the combo box, use the space bar to open the dropdown list, use the arrow to select the item, then press Enter.
- Users can arbitrarily freehand draw anywhere on the form using a stylus or mouse.
- Some Static Text Fields fields will prompt the Patient Appointments window to open. Select the desired information to proceed to the Fill Sheet window.
Fill Sheet Options
The following displays for any form being filled.
Note: If a signature is required for the selected sheet, changes to editable options (e.g., Show Order In Kiosk, Description, etc.) can only be saved if the form is signed.

- Date time: Indicates the date and time the form is generated.
- Description: Defaults to the sheet description set in Sheet Def Properties.
- Show Order in Kiosk: If adding this form to the Kiosk queue, enter the form's order in the queue. See Kiosk Manager.
- Internal Note: Enter any notes.
- Autosave to Images: Only appears when an Definitions: Image Categories has usage set to Autosave Forms. Check to automatically save a copy of the sheet to the Imaging Module.
- A copy of the sheet is saved to the Imaging Module upon clicking OK. A new copy of the sheet is added to the Imaging Module each time the sheet is saved when this box is checked.
- Checked by default if the specific sheet is marked as Autosave in Sheet Def Properties.
- Eraser Tool: Check the box to turn the pointer into an eraser then click and drag, or use the stylus, to erase a drawing. A drawing is defined as a continuous curved line without lifting the pen, so a continuous line is considered a single object. Uncheck to turn the eraser off.
- Print/Email: Print and/or email the form.
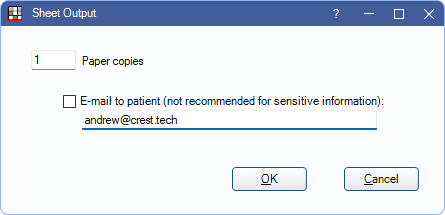
- Paper copies: Enter the number to print. The default value depends on the form or letter selected and the emails entered.
- Email to Patient: If an email is entered on the Edit Patient Information window it will show. Check the box to email the form or letter to the patient. When selected, the form or letter will be converted to a PDF and attached to the outgoing email.
- Email to Referral: Only shows if creating a referral letter. If an email is entered for the referral on the Edit Referral window it will show. Check the box to email the letter to the referral.
- Click OK. Paper copies are sent directly to the printer. Once printed or emailed, the form is archived in the database for later reference. Forms can be viewed at the bottom of the Account Module or in the Chart Module.
- Create PDF: Click to save the form as a PDF.
- Print: Click Print to send the form directly to the printer. Prints one copy at a time.
- Email: Click Email to open the Edit Email Message window with a PDF attached to the outgoing email. Finish sending the email from this window. See Email Message Edit.
- To Kiosk: Click to send the form to the Kiosk.
- Change Pat: Change patient. Associate the sheet with a different patient. Select the patient then click OK to move the sheet. It will be viewable in the new patient's Progress Notes. Changing patients will not change or affect any information in the sheet (e.g., patient name).
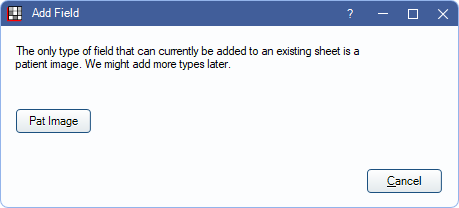
- Add Field: Add a new field to the sheet. Pat Image is currently the only field type that can be added. See Add Field below.
- Reduce Font Size: Only available for existing sheets. Click to reduce the font size of all text on the sheet by 0.5 pts. Click ? for more information on the tool.
- Delete: Remove a sheet. The Sheet Delete security permission is required.
- Deleted sheets will no longer show in the Chart Module or commlog but will still exist in the database.
- To view deleted sheets, open the Chart Module in Audit mode (Show Chart Views, click Audit).
- Undelete: Deleted sheets have an Undelete option. To restore a deleted sheet, double-click it in Audit mode to open the Fill Sheet window, then click Undelete.
- Unlock: Click to make edits to a signed sheet. Only applicable to sheets with a Sheet Signature Box. Only users with the Sheet Edit security permission can unlock the sheet. Any keystrokes or other changes made to the sheet invalidate (clear) the saved electronic signatures and the sheet must be signed again.
Add Field
Additional Pat Image fields can be added to a sheet.
To add a new field in the Fill Sheet window:
- Click Add Field. The Add Field window opens.
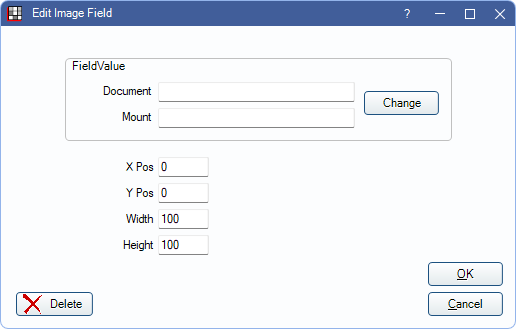
- Click Pat Image to add the field to the sheet. The Edit Image Field window will open. Currently, Pat Image is the only field type that can be added. Additional field types may be available in the future.
- Click Change to select a document or mount that has been uploaded to the patient's Imaging Module. Change X Pos and Y Pos to change the position of the image on the sheet. Change the Width and Height to change the size of the image. Click OK to add the field to the sheet.
- To edit the field after it has been added to the sheet, double-click the image from the sheet. The Edit Image Field window is opened again.
Select Procedures
Sheets that include the ProcsWithFee or ProcsNoFee grid will prompt to select procedures before opening the Fill Sheet window.
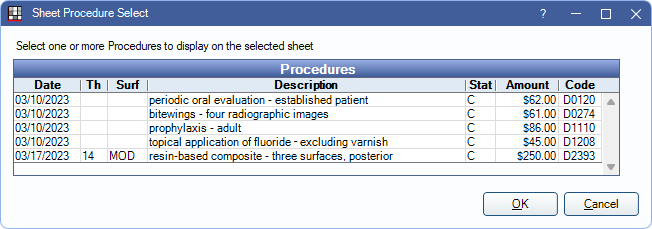
Select one or more procedures from the list, then click OK to add procedures to the sheet. Only procedures treatment planned or completed for the selected patient are listed.
To generate a sheet without the grid, click Cancel.
Columns:
- Date: Updates depending on procedure status. Will display the treatment planned date, date of scheduled appointment, or date completed.
- Th: Tooth number associated with the procedure.
- Surf: Surfaces associated with the procedure.
- Description: Procedure description.
- Stat: Procedure status.
- Amount: Procedure fee before any discounts, adjustments, or write-offs.
- Code: Procedure code.
Note: When a Consent Form with these one of these grids is generated from the Treatment Plan Module, this window is skipped. Only procedures already highlighted in the Treatment Plan are included on the sheet.