

Rx / Prescription
Paper prescriptions can be written and printed in Open Dental.
In the Chart Module toolbar, click New Rx.
Alternatively, in the Rx Manage window, click New Rx.
Setup:
- Rx / Prescriptions List: Add new medications to the Prescriptions list. Create templates for common prescriptions and set up drug interaction alerts based on allergies, medications, and/or problems.
- Rx Layout: Customize the print layout when printing one prescription on a page.
- Rx Multiple Layout: Customize the print layout for up to four prescriptions per page.
- Rx Manage: Create and manage prescriptions and/or print multiple prescriptions per page.
Select Prescription
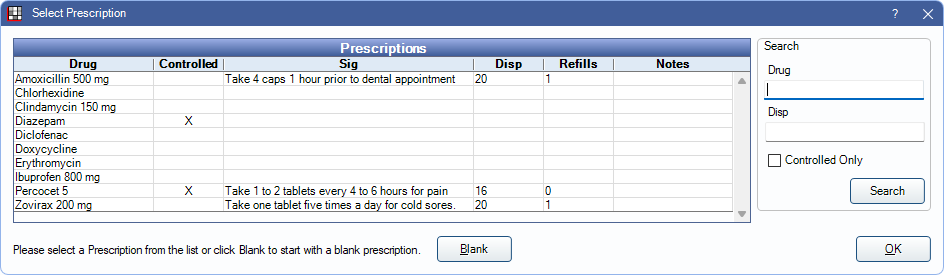
The Select Prescription window opens when creating a new prescription.
Prescriptions: This list shows any prescription templates added to Rx Setup. Double-click a prescription or highlight and click OK to start a new prescription for the patient.
Search: Enter criteria to filter the prescription list.
- Drug: Filter by drug name.
- Disp: Filter by dispense (Disp) amount.
- Controlled Only: Check to show only prescriptions marked as Controlled Substance.
- Click Search to update the prescriptions list based on the search criteria.
Blank: Create a prescription for the patient without using an existing template. Opens the following Edit Rx window without any details entered. Not available if EHR is turned on.
Highlight a prescription and click OK to create a new prescription for the patient using an existing template. Opens the following Edit Rx window with details added.
Edit Rx
Double-click a prescription template or click Blank from Select Prescriptions to create a new prescription. Alternatively, double-click an existing prescription from the Chart Module, Progress Notes area to make changes.
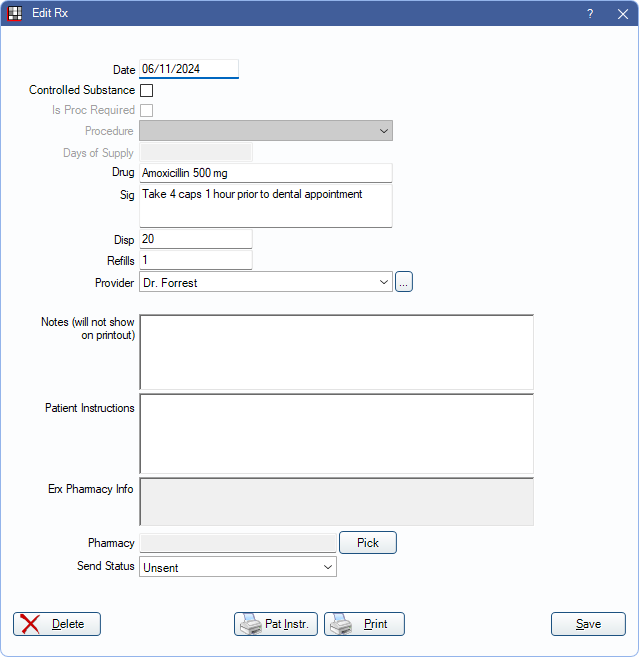
Enter or change details for the patient's individual prescription. Information entered here does not affect the Rx / Prescriptions List.
- Date: Enter the date of the prescription. Defaults to today.
- Controlled Substance: Check to display the selected provider's DEA# on the printed prescription.
- Is Proc Required: Check this box to require an associated procedure when printing.
- Procedure: Select a completed or treatment planned procedure associated with the prescription from the dropdown.
- Days of Supply: Required by some states. Enter the number of days this prescription will last. Can be a partial day if needed (e.g., 3.5). Also available as an output text field on Rx Layout sheets for single prescriptions.
- Drug: Drug name.
- Sig: Instructions for the patient on when and how to take the prescription. Only the first 255 are saved.
- Disp: Dispense number.
- Refills: Number of refills allowed.
- Provider: Provider filling the prescription.
- If Hide providers without DEA number from making (non electronic) prescriptions is enabled in Preferences, listed providers only include those with a DEA number entered in Edit Provider.
- If the logged-in user is associated with a provider, that provider is automatically selected.
- If the logged-in user is not associated with a provider, the patient's primary provider is selected, if they are in the available list. If the primary provider is not in the list (e.g., if they have no DEA number entered), the provider is blank by default and must be selected manually. If there is only one provider in the list, they are automatically selected. Click the dropdown or [...] to select a provider.
- When Clinics are enabled, the provider list is limited to providers associated with the clinic on the prescription. If no providers are available for the clinic, the Clinic default provider is selected.
- If EHR is enabled, the automatically selected provider is locked when creating the prescription. Users with the Rx Edit Permission can edit the provider once the prescription is saved.
- List of available providers does not include providers marked as Not a Person in the Edit Provider window.
- Dosage Code: Only available when EHR is turned on.
- Notes: This is only for internal office use and does not appear on printed prescriptions.
- Patient Instructions: Provide instruction to the patient on how the medication should be taken. Right-Click the text box for additional options.
- eRx Pharmacy Info: Informational field that automatically populates with the pharmacy name when electronic prescriptions are received. This helps verify the correct clinic is selected.
- Pharmacy: Click Pick to select a pharmacy from the Pharmacies if the prescription is called in.
- Send Status: Choose the status of the selected prescription. Options include Unsent, InElectQueue, SentElect, Printed, Faxed, CalledIn, GaveScript, Pending.
- Clinic: Select the clinic associated with the prescription. Displays clinic address information when printed.
- If the preference Rx use selected clinic from Clinic menu instead of selected patient's default clinic is enabled, the clinic defaults to the currently selected clinic in the Main Menu. If Headquarters is selected, defaults to Unassigned.
- If the preference, Rx use selected clinic from Clinic menu instead of selected patient's default clinic, is disabled, the clinic defaults to the patient's assigned clinic.
Delete: Remove prescription details from the patient. Only removes the prescription from Progress Notes. The prescription must be removed from the patient's Medications list separately if needed.
Audit Trail: Open Audit Trail for Rx to view changes to the prescription. See Audit Trail for Rx section for details.
Pat Instr.: Print instructions for the patient for this prescription. Uses the first Rx Instructions Layout in the custom Sheets list, if any. If there are no custom sheets, uses the default RxInstruction sheet.
Click Save to create the prescription or keep changes without printing.
Click Print to save the prescription and send it to a printer.
- Non-controlled substances are sent to the default Rxs printer set in Printer Setup. Controlled substances are sent to the default send it to the default Controlled Rxs printer.
- If the Send Status is set to anything other than InElectQueue or SentElect, clicking the Print button automatically changes the status to Printed.
- The Rx Layout Sheet set as the default for Rx in Sheet Def Defaults is used to print single prescriptions.
- To print multiple prescriptions on one page, see Rx Manage.
Saved prescriptions can be found in the Progress Notes area in the Chart Module and to the patient's Medications list. Prescriptions are not previewed before printing, so they cannot be digitally signed or changed before printing.
Procedure Required on Prescription
Some states require an associated procedure show on their printed prescriptions.
To enable the options to attach procedures to a prescription, first do the following:
- Go to Lists, Prescriptions and check Procedure code required on some prescriptions.
- If using clinics, go to the Clinics list and enable Proc code required on Rx from this clinic for each Clinic as needed.
Once the option is enabled:
- To automatically check the Is Proc Required box when creating a new prescription, check the box in individual Edit Rx Templates.
- In the Edit Rx window, when creating or editing a patient's prescription:
- The Is Proc Required box can be manually checked or unchecked.
- A completed or treatment planned procedure can be selected from the Procedure dropdown to attach to the prescription.
- Days of Supply can be entered.
- To include an ICD-10 diagnosis code, attach it to the procedure from Procedure - Medical Tab.
If attached to the prescription, procedure details (including ICD-10 codes) are included on the default Rx Sheet when printing.
Audit Trail for Rx
Click Audit Trail from a patient's prescription to view an audit trail specific to the prescription. Any time a prescription is created, edited, deleted, or printed, a log is created in the Audit Trail for Rx.
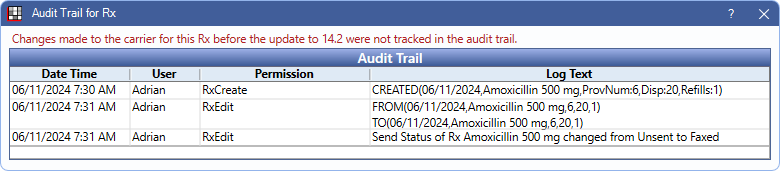
Details in the Audit Trail for Rx mirror the Audit Trail tool.
Additional Information
Automation actions can be set up to occur when creating a prescription.
Some regions may require controlled substance prescriptions to include a CDT procedure code. The Rx Sheet template can be edited in two ways to accommodate this:
- Add a static text field surrounded by a rectangle box, then handwrite the CDT code once it is printed.
- Add ServiceNote as a static text field (see Sheet Static Text Field) then enter the procedure code in the service note field of the Medical. The downside is that you may have to clear out any other service notes you have already entered and clear the code after printing the prescription.
If using eRx, see NewCrop eRX / Prescription or DoseSpot eRx / Prescription for details on adding CDT codes.